EmacsWithPHPMode
- Gentoo Emacs 에서 php-mode를 사용하기
도움주신분
emacs에서 필요한 mode의 설치
기본적으로 2가지 mode가 필요합니다.
- php-mode :: http://php-mode.sourceforge.net
- mmm-mode :: http://mmm-mode.sourceforge.net
gentoo에서라면 간단합니다. 우리에게는 portage가 있으니까요. emerge를 통해서 다음의 버전을 설치해주면 됩니다
- php-mode-1.5.0
- mmm-mode-0.5.1
이중에서 mmm-mode 는 minor mode라고 합니다. M-x mmm-mode 로 toggle 할 수 있습니다.
자 이제부터 설정을 잡아보도록 할까요?
emacs에서의 설정
환경설정확인
아래쪽의 참고주소의 내용을 기초로 설정을 잡아보도록 하겠습니다.
1. M-x ielm 이라는 명령을 통해서 ELISP command mode로 진입합니다. 탈출은 C-x k (또는 M-x kill-this-buffer) 입니다.
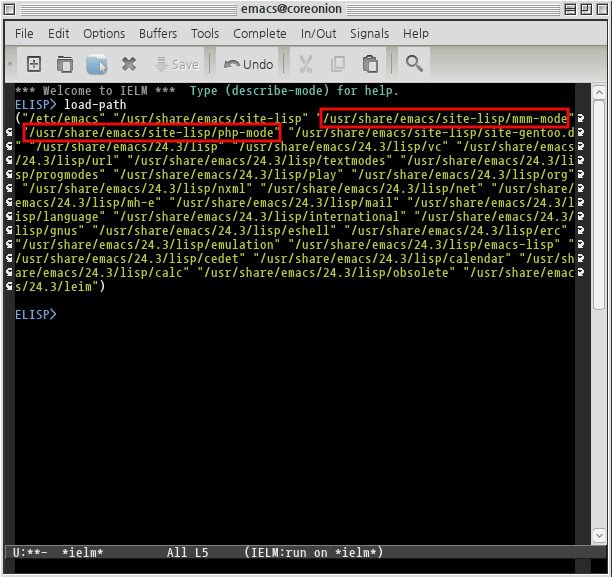
2. 진입후 load-path 라는 명령을 입력합니다. 아래와 같은 화면을 보실 수 있습니다.
3, 위의 화면에서 붉은색으로 표시되어있는 부분이 나오면 기본적으로 module은 설치되었다고 봐도 됩니다. 나오는 내용이 많은경우 C-r 로 mmm-mode 같은 문자열 검색으로 module이 등록되어있는지의 여부를 확인합니다.
위의 과정에서 module이 등록된걸 확인한다면 슬슬 다음단계로 진행해도 됩니다
emacs 설정파일 편집
참고주소에 나온 내용은 ~/.emacs.d 의 디렉토리 안쪽에 module 을 설치하는 경우를 기준해서 설명해놓았습니다. 여기서는 gentoo linux를 기준으로 하기때문에 설정파일의 내용이 쪼금 틀려져야 합니다.
일단 참고주소에서 알려주는 설정파일의 내용은 다음과 같습니다.
(setq load-path (cons (expand-file-name "~/.emacs.d/") load-path))
(require 'php-mode)

(add-to-list 'load-path (expand-file-name "~/.emacs.d/mmm-mode-0.4.8"))
(require 'mmm-mode)

(setq mmm-global-mode 'maybe)
(mmm-add-mode-ext-class nil "\\.php3?\\'" 'html-php)
(mmm-add-classes
 '((html-php
    :submode php-mode
    :front "<\\?\\(php\\)?"
    :back "\\?>")))
(autoload 'php-mode "php-mode" "PHP editing mode" t)
(add-to-list 'auto-mode-alist '("\\.php3?\\'" . html-mode))
우리가 설정해줄 내용은 다음과 같습니다.
(require 'php-mode)
(require 'mmm-mode)

(add-hook 'html-mode-hook #'(lambda () (mmm-mode)))
(add-hook 'php-mode-hook #'(lambda () (mmm-mode)))
(mmm-add-mode-ext-class nil "\\.php3?\\'" 'html-php)
(mmm-add-classes
 '((html-php
    :submode php-mode
    :front "<\\?\\(php\\)?"
    :back "\\?>")))
(autoload 'php-mode "php-mode" "PHP editing mode" t)
(add-to-list 'auto-mode-alist '("\\.php3?\\'" . html-mode))
약간의 차이가 있죠? 이미 load-path 에서 module이 등록된걸 확인했기때문에 별도로 setq load-path 를 해줄 필요가 없는겁니다.
이제부터 M-x php-mode 로 php-mode 를 사용하시면 되겠습니다. 블럭을 설정한다음 Tab 키를 눌러주세요 :D
<?php
class ArrayWeakComparisonTest extends PHPUnit_Framework_TestCase
{
public function testEquality() {
$this->assertEquals(
array(1 ,2,3 ,4,5,6),
array('1',2,33,4,5,6)
);
}
}
?>
위의 코드를 아래와 같이 바꿀 수 있습니다. 이걸 영문 문화권에서는 preety-printing 이라고 한다고 하더라구요.
<?php
class ArrayWeakComparisonTest extends PHPUnit_Framework_TestCase
{
  public function testEquality() {
    $this->assertEquals(
			array(1 ,2,3 ,4,5,6),
			array('1',2,33,4,5,6)
			);
  }
}
?>
추가설정::단축키
위의 경우 mediawiki의 내용을 편집하는 코드 중간에 php code가 들어가면 indent 처리가 원하는대로 되지 않는 경우가 있습니다.
(기본적으로 php-mode 는 c-mode 의 확장이라 보시면 됩니다)
연금술사님의 도움으로 아래와 같은 코드를 얻을 수 있었습니다.
(defun copy-and-indent-region ()
  (interactive)
  (save-excursion
    (when (region-active-p)
      (progn
        (kill-region (region-beginning) (region-end))
        (with-temp-buffer
          (c-mode)
          (yank)
          (indent-region (point-min) (point-max))
          (kill-region (point-min) (point-max)))
        (yank)
        (message "copied and indented selected region.")))))

(global-set-key "\C-c\C-i" 'copy-and-indent-region)
기본 내용인 즉슨 선택한 영역을 emacs에서 버처를 새로 잡아서 보내고 그 안에서 indent처리를 한다음 처리된 내용을 다시 붙여넣기하는정도...라고 보면 된답니다..(덜덜)
마지막 한줄덕분에 C-c Tab 이라는 단축키를 사용할 수 있게 되었습니다.
(그런데 가끔 emacs가 죽어요.. 왜일까요... 이것때문은 아닌거같은데...T.T)
마치면서
연금술사님의 덕분에 모처럼 즐삽 펐습니다..(쿨럭)
emacs.. 좀 미묘한 매력이 있는거같네요 :D
참고주소
- [Emacs] MMM-mode 와 PHP-mode 의 결합 :: http://crazia.tistory.com/entry/Emacs-MMM-mode-%EC%99%80-PHP-mode-%EC%9D%98-%EA%B2%B0%ED%95%A9
