Gentoo With PostgreSQL
- Gentoo Linux에서 postgreSQL사용하기
본 문서는 gentoo linux에서 postgreSQL을 사용하기위한 기본 내용을 담고있다.
또한 문서의 작성일 또는 사용된 software의 버전을 참고해서 향후 사용하는데 참고할 수 있게 하는것에 그 목적이 있다.
기본사항
- gentoo linux
- postgreSQL 9.2.2
내용
postgreSQL의 설치
postgreSQL(이하 pgsql)은 9.2.2버전을 설치하는것으로 전제한다.
- postgresql-base-9.2.2-r1
- postgresql-server-9.2.2-r1
이상 2개의 버전을 설치하기로 한다
postgreSQL의 설치 후 기본초기화
pgsql을 설치한후 /etc/init.d/postgresql-9.2 start 를 실행하면 다음과 같은 문구가 나온다
coreonion ~ # /etc/init.d/postgresql-9.2 start
 * Caching service dependencies ...                                       [ ok ]
 * Directory not found: /var/lib/postgresql/9.2/data
 * HINT: Ensure that DATA_DIR points to the right path.
 * HINT: Or perhaps you need to create the database cluster:
 *     emerge --config dev-db/postgresql-server:9.2
 * ERROR: postgresql-9.2 failed to start
물론 위의 내용은 pgsql을 초기화 하지 않았기떄문에 나오는 내용이며
시키는대로 초기화를 해준다면 아무런 문제가 없다.
coreonion ~ # emerge --config dev-db/postgresql-server:9.2


Configuring pkg...

 * You can modify the paths and options passed to initdb by editing:
 *     /etc/conf.d/postgresql-9.2
 *
 * Information on options that can be passed to initdb are found at:
 *     http://www.postgresql.org/docs/9.2/static/creating-cluster.html
 *     http://www.postgresql.org/docs/9.2/static/app-initdb.html
 *
 * PG_INITDB_OPTS is currently set to:
 *     (none)
 *
 * Configuration files will be installed to:
 *     /etc/postgresql-9.2/
 *
 * The database cluster will be created in:
 *     /var/lib/postgresql/9.2/data
 *
 * Are you ready to continue? (y/n)
이상의 내용으로 pgsql을 초기화할것인가를 묻는다.
당연히 y를 눌러 pgsql의 사용을 위한 초기화를 진행한다.
아래와같은 내용이 나오면서 초기화가 진행된다
 * Checking system parameters...
 * Checking whether your system supports at least 128 connections...
 * Passed.
 * Creating the data directory ...
 * Initializing the database ...
The files belonging to this database system will be owned by user "postgres".
This user must also own the server process.

The database cluster will be initialized with locale "ko_KR.utf8".
The default database encoding has accordingly been set to "UTF8".
initdb: could not find suitable text search configuration for locale "ko_KR.utf8"
The default text search configuration will be set to "simple".

fixing permissions on existing directory /var/lib/postgresql/9.2/data ... ok
creating subdirectories ... ok
selecting default max_connections ... 100
selecting default shared_buffers ... 24MB
creating configuration files ... ok
creating template1 database in /var/lib/postgresql/9.2/data/base/1 ... ok
initializing pg_authid ... ok
initializing dependencies ... ok
creating system views ... ok
loading system objects' descriptions ... ok
creating collations ... ok
creating conversions ... ok
creating dictionaries ... ok
setting privileges on built-in objects ... ok
creating information schema ... ok
loading PL/pgSQL server-side language ... ok
vacuuming database template1 ... ok
copying template1 to template0 ... ok
copying template1 to postgres ... ok

WARNING: enabling "trust" authentication for local connections
You can change this by editing pg_hba.conf or using the option -A, or
--auth-local and --auth-host, the next time you run initdb.

Success. You can now start the database server using:

    /usr/lib64/postgresql-9.2/bin/postgres -D /var/lib/postgresql/9.2/data
or
    /usr/lib64/postgresql-9.2/bin/pg_ctl -D /var/lib/postgresql/9.2/data -l logfile start

 * The autovacuum function, which was in contrib, has been moved to the main
 * PostgreSQL functions starting with 8.1, and starting with 8.4 is now enabled
 * by default. You can disable it in the cluster's:
 *     /etc/postgresql-9.2/postgresql.conf
 *
 * The PostgreSQL server, by default, will log events to:
 *     /var/lib/postgresql/9.2/data/postmaster.log
 *
 * You should use the '/etc/init.d/postgresql-9.2' script to run PostgreSQL
 * instead of 'pg_ctl'.
이중에서 혹시 중요할만한 내용을 점검해보기로한다.
- pgsql의 초기데이터(이후도 마찬가지겠지만)가 저장되는 경로는 /var/lib/postgresql/9.2/data
- pgsql을 다시 초기화하고싶으면 data를 포함한 디렉토리를 rm -rf 로 제거해주면 끝
- pgsql에는 vacuum이라는게 있다. 모르겠으면 별도 검색 필요
- vacuum을 자동으로 처리해주는 autovacuum이 8.4 버전 이후는 기본으로 enable. 끄고싶으면 /etc/postgresql-9.2/postgresql.conf 설정파일을 참고할것.
이후 아래의 명령어를 실행하고 결과를 보면 기본설정은 제대로 된것으로 판단해도 무방하다
coreonion ~ # /etc/init.d/postgresql-9.2 start
 * /var/run/postgresql: creating directory
 * /var/run/postgresql: correcting owner
 * Starting PostgreSQL ...                              [ ok ]
postgreSQL에서의 사용자 생성
pgsql에서 사용자를 생성한다는것은 사용자의 role을 생성한다는 것으로 생각하면 된다.
다음을 타이핑하고 진행해서 role을 생성한다.
물론 database는 구동이 되어있는 상태여야한다
coreonion ~ # createuser -U postgres -P mumu
새 롤의 암호:
암호 확인:
보이듯이 암호만 설정해주면 user를 사용할수 있는 최소한의 준비가 끝난다.
물론 pgsql을 compile할때 LINGUAS="ko en"을 해줘야 한글 메세지가 나온다.
이후 /etc/postgresql-9.2/pg_hba.conf 파일의 내용을 보면 다음과같은 부분이 있다
# TYPE  DATABASE        USER            ADDRESS                 METHOD

# "local" is for Unix domain socket connections only
local   all             all                                     trust
# IPv4 local connections:
host    all             all             127.0.0.1/32            trust
# IPv6 local connections:
host    all             all             ::1/128                 trust
# Allow replication connections from localhost, by a user with the
# replication privilege.
#local   replication     postgres                                trust
#host    replication     postgres        127.0.0.1/32            trust
#host    replication     postgres        ::1/128                 trust
물론 pgsql의 접근권한을 설정하는 파일로서 별다른 외부에서 접근을 제한할 필요가 없다면 기본값으로 놔두면 된다. 크게 신경쓸 필요는 없음. 하지만 참고는 해두어야 나중에 외부에서 접근하도록 설정할 수 있다.
crop해놓은 내용의 제일 윗줄을 보면 각 필드가 무엇을 의미하는지 알 수 있다.
예를들어 생성한 특정DB를 모든 IP에서 접근하게 하고싶다면 다음과같이 설정하면 된다
host DATABASE_NAME all 빈칸 trust
이정도면 사용자의 접근권한에 대한 기본설명은 끝난다.
(왜인지는 모르겠지만.... 요즘은 다른 role에 대한 설명을 안물어본다)
postgreSQL에서 database생성하기
pgsql에서 db생성을 하기위한 명령어는 다음과 같다.
이후부터는 작업의 편의를 위해 postgres 계정의 권한으로 진행하기로 한다.
(사실 user생성부터 postgres계정으로 진행하는게 맞다. pg_hba.conf 파일의 수정 빼고)
postgres@coreonion ~ $ createdb -E UTF8 -l ko_KR.utf8 -O mumu mumudb
썰렁하게 끝난다. 별도로 나오는 말도 없다. 여기가 그냥 끝.
간단하게 옵션을 설명하자면 다음과같다.
- -E 데이터베이스 인코딩
- -l 데이터베이스의 locale 설정.
- -O 생성되는 데이터베이스의 소유자. 지정하고싶은 사람을 지정하면 된다.
- mumudb는 데이터베이스의 이름
postgreSQL의 admin user 비밀번호 변경
pgsql을 maintenance하는 pgsql내부의 postmaster계정은 postgres이다
다음의 과정을 통해 비번을 변경하도록 한다.
postgres@coreonion ~ $ psql -U postgres
psql (9.2.2)
Type "help" for help.

postgres=# \password
Enter new password:
Enter it again:
postgres=#
물론 비번을 보여줄 수는 없다.
postgreSQL을 사용하는데 필요한 설정파일
gentoo linux에서의 환경설정 파일
gentoo linux의 경우는 해당되는 내용이 /etc/conf.d/postgresql-9.2 파일안에 있다
기존에 pgsql을 사용하고있었는데 migration하는경우는 이 파일을 필수적으로 보도록 한다.
또한 파일의 내용중 아래의 부분을 수정해놓으면 이후 database를 생성할때 추가적으로 -l 옵션을 줘야할 필요가 없다.
PG_INITDB_OPTS="--locale=ko_KR.UTF-8"
postgreSQL을 원격에서 접속가능하게 하기위한 설정
/etc/postgresql-9.2/postgresql.conf 파일안에서 수정해줘야할 부분이 있다
port = 5432
아마도 당신이 pgsql을 처음설치했다면 위의 부분이 주석처리 되어있을것이다.
물론 주석을 풀고 값을 설정해주어야 한다.
접근을 별도로 차단하고 싶으면 위쪽의 listen_addresses 부분을 설정해주면 손쉽게 접근IP를 특정할 수 있다.
psql을 사용한 postgreSQL의 접속테스트
아래의 명령어대로 입력해주면 간단하다
coreonion postgresql-9.2 # psql -h localhost -p 5432 -U postgres
psql (9.2.2)
Type "help" for help.

postgres=#
참고로 postgres가 아니라 다른계정으로 login하면 다음같은 prompt를 볼 수 있다.
mumu=>
psql로 login한 상태에서 다음의 query등을 테스트해서 아래와같은 내용이 나오면 성공.
lookandwalk-> \dt
No relations found.
아무것도 생성된 테이블이 없으니 relation이 없다고 나오는건 당연한 결과다.
pgadmin3를 이용한 pgsql의 접속테스트
일단 pgadmin3을 설치하도록 한다. 그래야 이후를 진행할 수 있으니....
coreonion ~ # emerge -pv pgadmin3

These are the packages that would be merged, in order:

Calculating dependencies... done!
[ebuild     UD ] dev-db/pgadmin3-1.14.3 [1.16.1-r1] USE="-debug (-databasedesigner%*)" 14,722 kB
아마도 아무것도 설치되어있는 않은 상태라면 좀 다른 메세지가 나오게 되겠지만....
일단 위의패키지를 확인하고 설치하도록 한다.
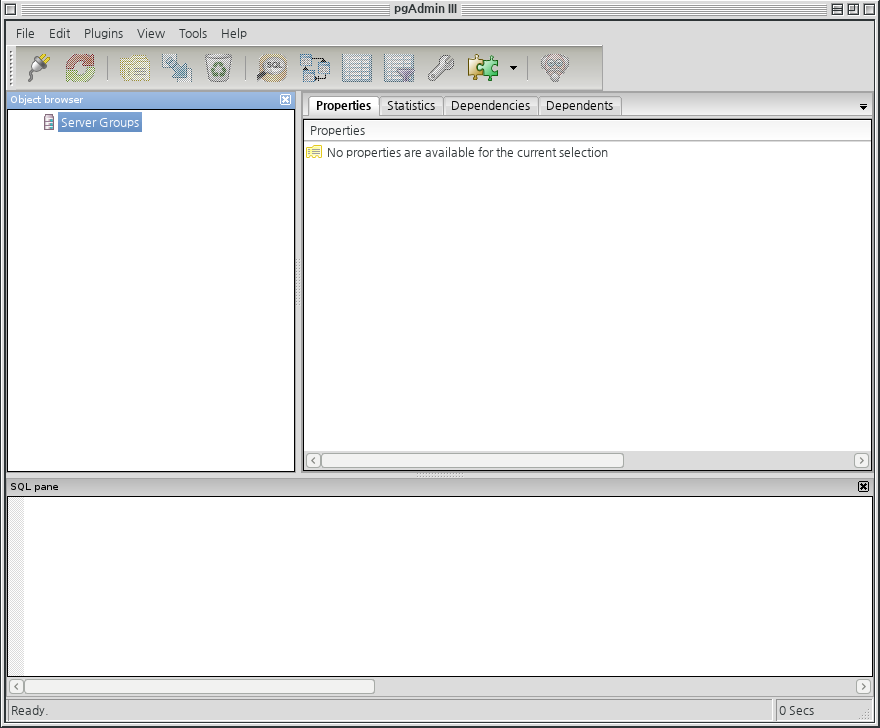
그리고 pgadmin3라는 명령어로 실행하면 다음과 같은 화면이 나온다.
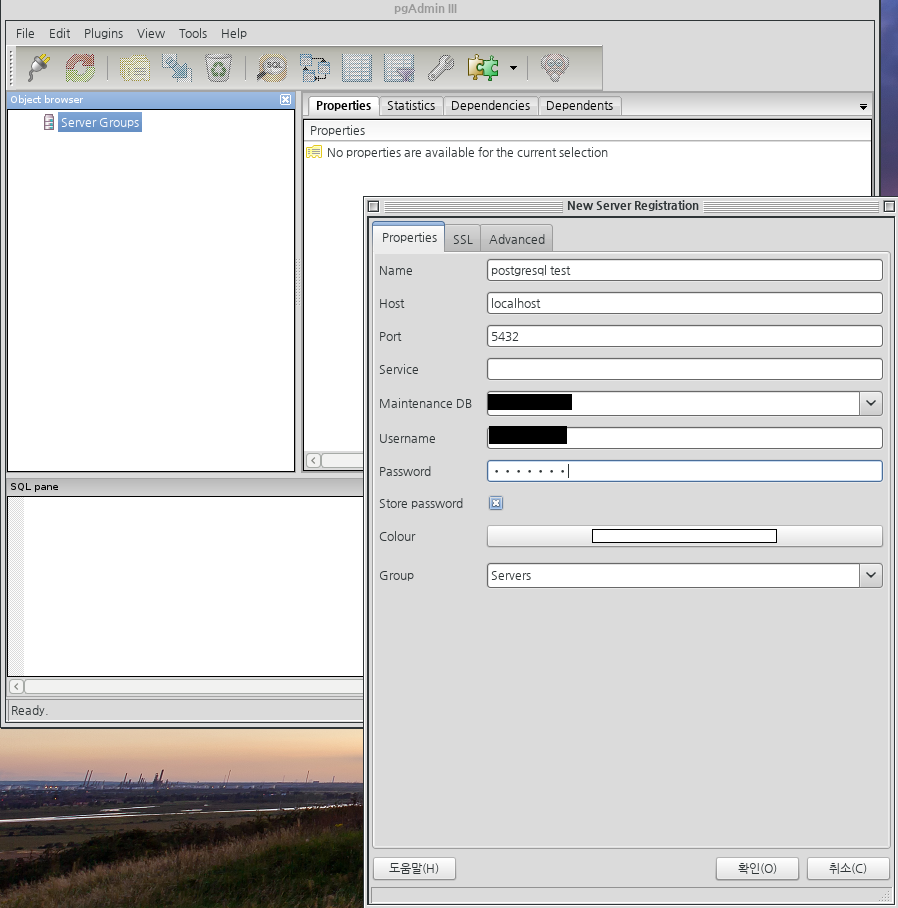
위쪽의 전기콘센트같은 아이콘을 눌러서 접속할 서버를 추가하는 작업을 진행한다. 필요한 항목을 입력하면 다음과같이 된다.
항목을 간단하게 설명하면 다음과 같다
- Name :: pgadmin3 프로그램 내에서 사용하기위한 이름. 맘대로 붙여도 된다
- Host :: 접속할 서버의 주소. 이 경우에는 pgadmin3와 같은 PC에서 돌기때문에 localhost를 지정해줬다
- Post :: 접속할 서버 daemon의 port번호. 위의 postgresql.conf 부분 참고
- MaintenamceDB :: 접속할 서버의 database이름. 이 문서대로 진행했다면 mumudb가 되겠다
- Username :: database에 권한이 할당된 user의 이름.
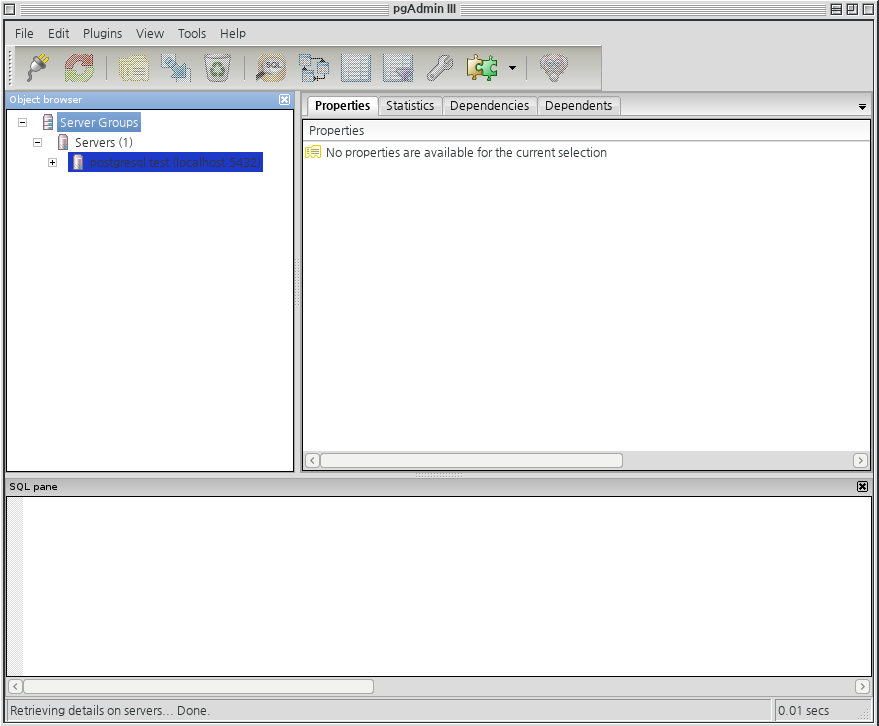
제대로 값을 설정한다음 다음과같이 설정한 서버가 추가된다
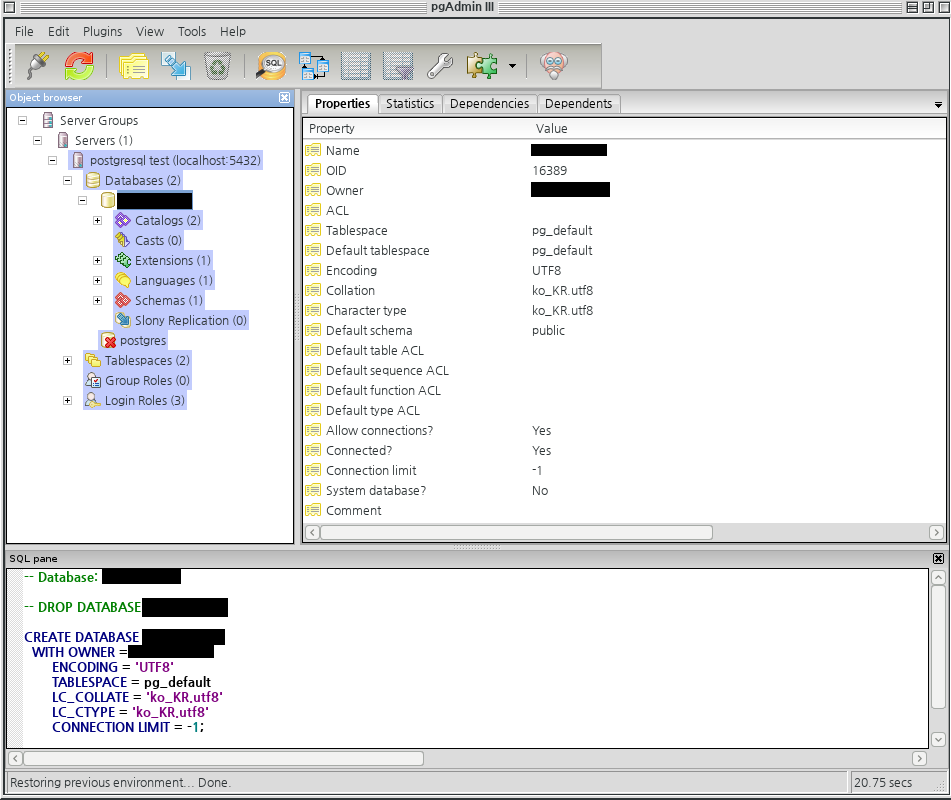
해당되는 서버를 클릭해서 제대로 접속이 되는지를 확인한다.
화면에 보이는것같은 정보가 나온다면 접속은 제대로 성공한것이다.
이제 맘대로 쓰면 된다.
postgreSQL 시스템에서 알아두면 도움되는 테이블목록(system table)
- pg_tables :: 등록된 table의 목록
- pg_database :: 등록된 db의 목록
- pg_user :: 등록된 user의 목록
참고사항
- postgreSQL사용시 9.2.1은 내부 procedure사용시 버그가 있음. 9.2.2 이상을 사용하기 바람.
참고자료
http://www.gentoo.org/doc/en/postgres-howto.xml
http://en.gentoo-wiki.com/wiki/PostgreSQL
http://www.superuser.co.kr/superuserboard/view.html?id=6597&code=linux&start=0&position=
http://www.postgresql.org/docs/8.1/static/index.html
http://database.sarang.net/database/postgres/tutorial/lecture/c89.htm#AEN106
http://en.wikibooks.org/wiki/Converting_MySQL_to_PostgreSQL


