Morphic Designer in Pharo2: Difference between revisions
Onionmixer (talk | contribs) (오타수정) |
(No difference)
|
Latest revision as of 13:18, 1 January 2014
- morphic designer 를 pharo 2.0 에서 사용하기
개요
morphic designer 는 squeak-pharo 에서 UI Design 을 진행하고 그것을 이용해서 프로그램을 만들기 위한 도구로서 cincom Visual works 의 UI Painter 같은 프로그램이라 할 수 있다. 이 문서의 목적은 morphic designer 를 Pharo 2.0 정도의 버전을 대상으로 사용하는 방법을 알려주는것에 그 목적이 있다.
morphic designer 의 homepage 주소는 다음과 같다.
위의 홈페이지로 들어가면 morphic designer 어떻게 사용하는지를 짧지만 직관적으로 보여주는 동영상이 있다. 궁금한사람은 동영상을 먼저 보도록 한다.
그리고 당연한 말이겠지만 이 글을 읽기전에 독자의 플랫폼에서 구동이 가능한 pharo 2.0 버전을 미리 준비해야한다는것을 잊지말자. 이 글은 pharo 의 사용법을 가르쳐주는 글은 아니다.
Step 01 :: Morphic Designer 의 설치-monticello 를 이용하는 방법
morphic designer 는 squeak-pharo 에서 패키지관리시스템으로 널리 쓰이고있는 몬티첼로를 이용해서 설치를 할 수 있다. 설치방법은 그리 어렵지 않으니 스크린샷을 참고해가며 설치를 진행해보도록 하자.
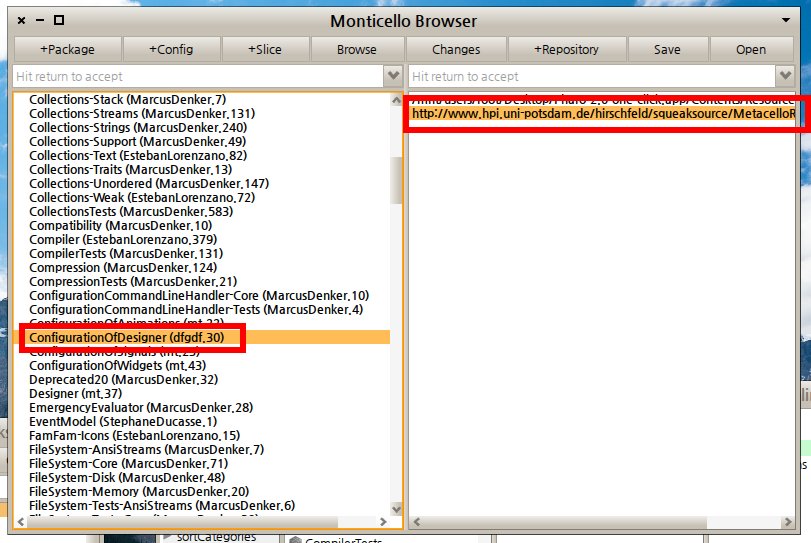
일단 pharo 에서 몬티첼로를 연다. 지금 보이는 스크린샷은 해당되는 패키지가 추가된 경우의 스크린샷이다. 아래의 스크린샷과 비슷한 화면이 보인다면 상단의 "+package" 버튼을 눌러서 패키지의 이름을 정해준다. 물론 패키지의 이름은 "ConfigurationOfDesigner" 가 되겠다. 패키지를 추가하게되면 repository 의 입력을 요구하는데 아래의 코드처럼 입력하면 된다.
MCHttpRepository
	location: 'http://www.hpi.uni-potsdam.de/hirschfeld/squeaksource/MetacelloRepository'
	user: ''
	password: ''
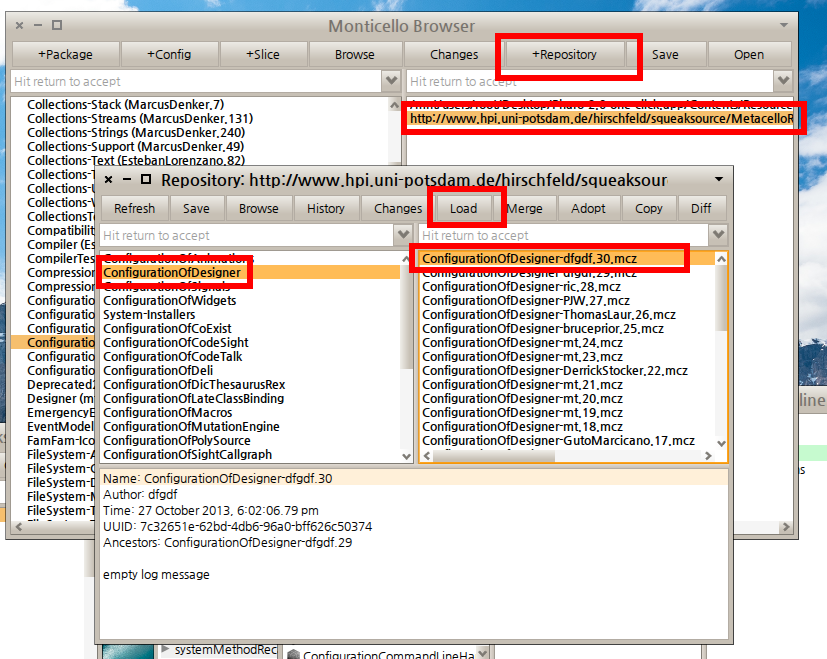
자 코드를 입력했는가? 그렇다면 이제 다시 몬티첼로의 메인화면중 좌측 pane 에서 "ConfigurationOfDesigner" 를 마우스로 더블클릭한다. 그러면 아래와같은 화면을 볼 수 있다.
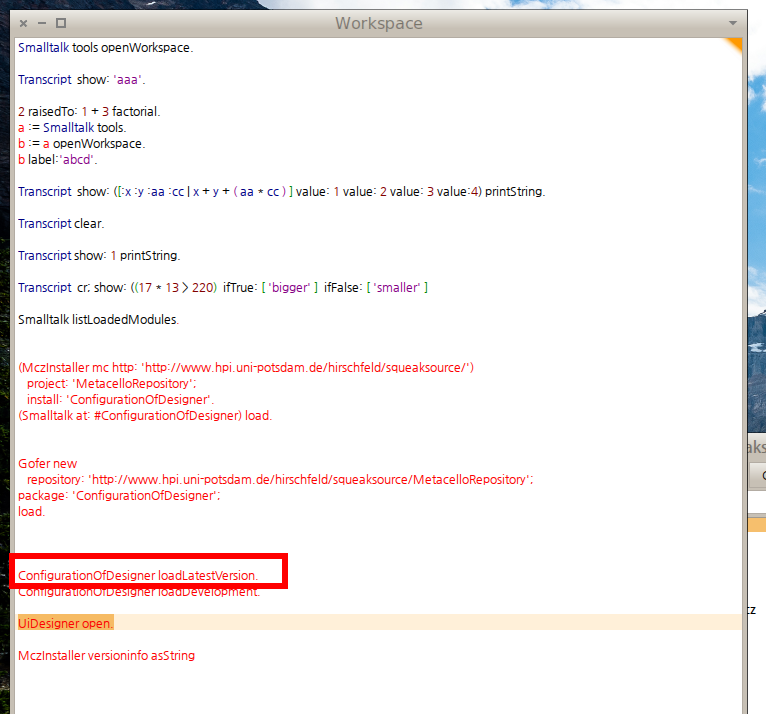
화면상에 붉은 박스들을 좀 더 신경써서 보도록 한다. 일단 해당되는 repository 안에는 정말 많은 패키지들이 있는거같다. 하지만 우리는 목적에 충실하도록 하자. 팝업창의 좌측 pane 에 있는 "ConfigurationOfDesigner" 를 클릭하면 해당되는 패키지의 몬티첼로 버전들이 우측 pane 에 좌르륵 나온다. 당연히 최신버전이 좋은것 아니겠는가? 목록에서 제일 위에있는것을 누르고 "Load" 버튼을 눌러서 패키지의 로딩을 진행한다. 그 다음 workspace 를 열어서 스크린샷처럼 코드를 입력하고 실행한다.
ConfigurationOfDesigner loadLatestVersion.
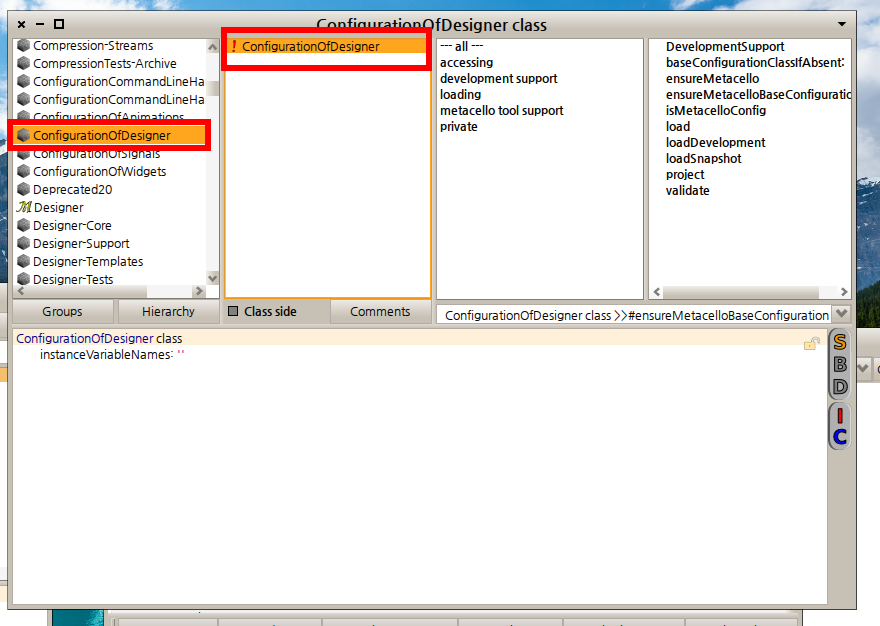
패키지의 로딩이 진행되면 system browser(nautilus) 또는 Finder 에서 "ConfigurationOfDesigner" 를 찾을 수 있다. 스크린샷을 참고해서 패키지가 Load 된걸 확인해보자.
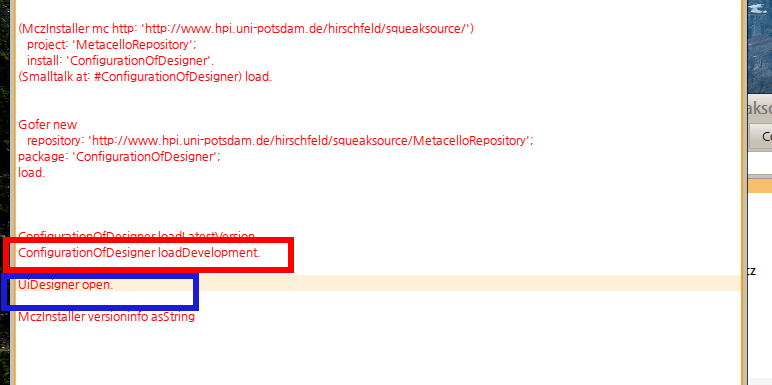
패키지가 로딩된것을 확인했다면 workspace 에서 이후 작업을 진행해야한다. 아래의 코드를 입력하도록 한다. 물론 한줄씩 doit 해야 한다는것을 잊지말자. 그래야 문제가 생겨도 디버깅이 편하다.
ConfigurationOfDesigner loadDevelopment.

UiDesigner open.
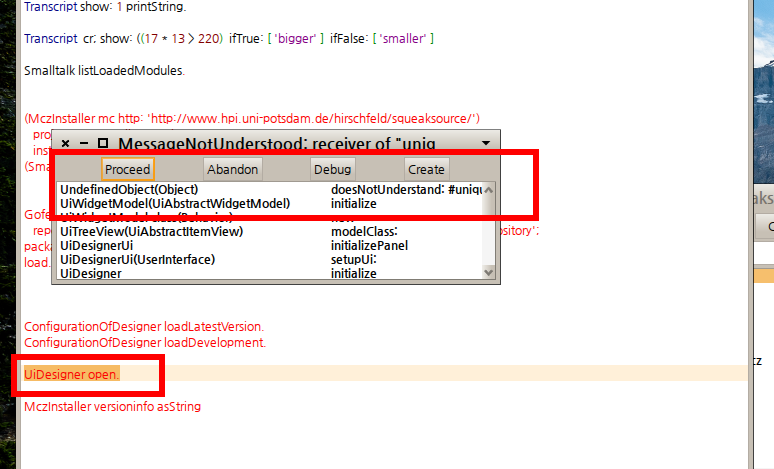
뭐 본인은 이미 경험했지만.. 당연히 UiDesigner open. 이라는 코드를 실행하는순간.. 에러가 뜬다.
Step 02 :: Morphic Designer 의 디버깅
일단 아래의 에러 스크린샷이 독자의 스크린샷과 같은 상황인지를 확인한다.
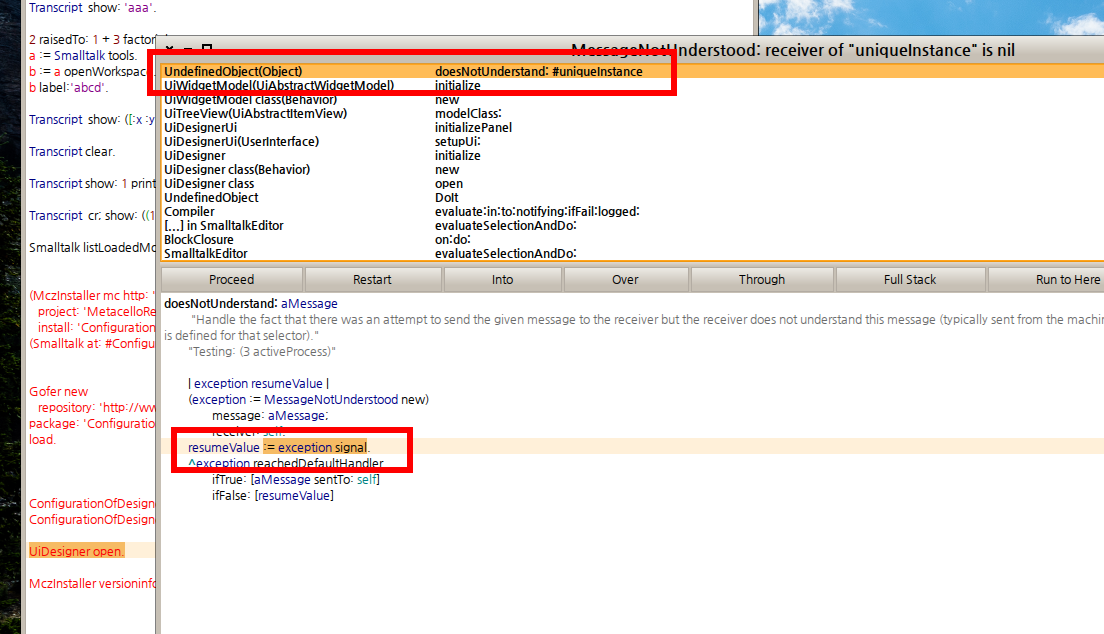
같은 상태라면 일단 성공(?)이다. 지금은 에러가 나야하는것이 정상이다. 물론 pharo 사용자들은 이런경우를 두려워하지 않아도 된다. 디버깅하면 되니까. 위의 list 부분을 클릭해서 디버깅 mode 로 진입하도록 한다. 제대로 진입했다면 아래와 같은 화면을 볼 수 있어야 한다.
화면의 상단을 보면 debug 를 step 별로 진행할 수 있으며 아래쪽에는 현재 step 에 해당하는 코드가 나온다. 일단 내용상으로는 error exception 이 발생할것으로 보인다. 이것만으로는 "발생했다" 라는것만 알 수 있으니 위쪽의 step 에서 바로 아래단계를 선택해보도록 하자.
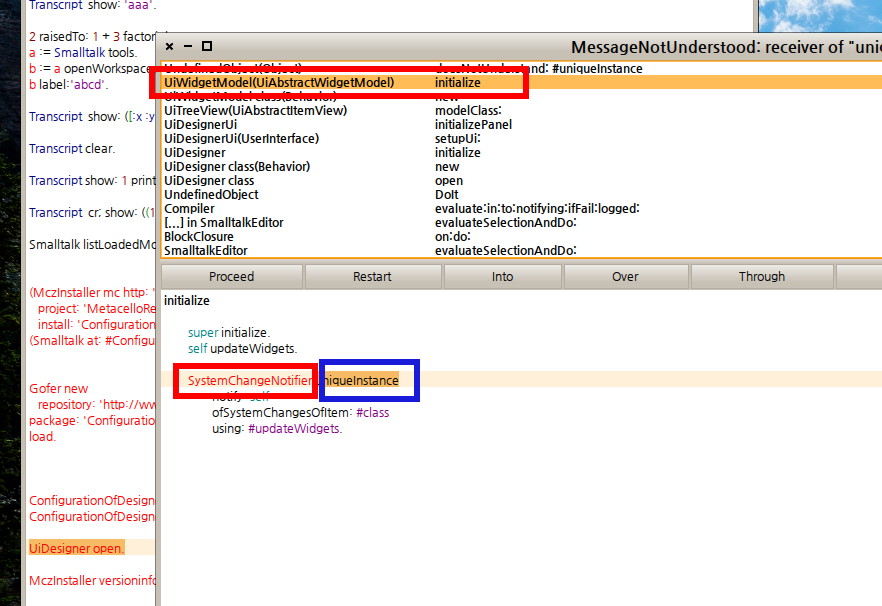
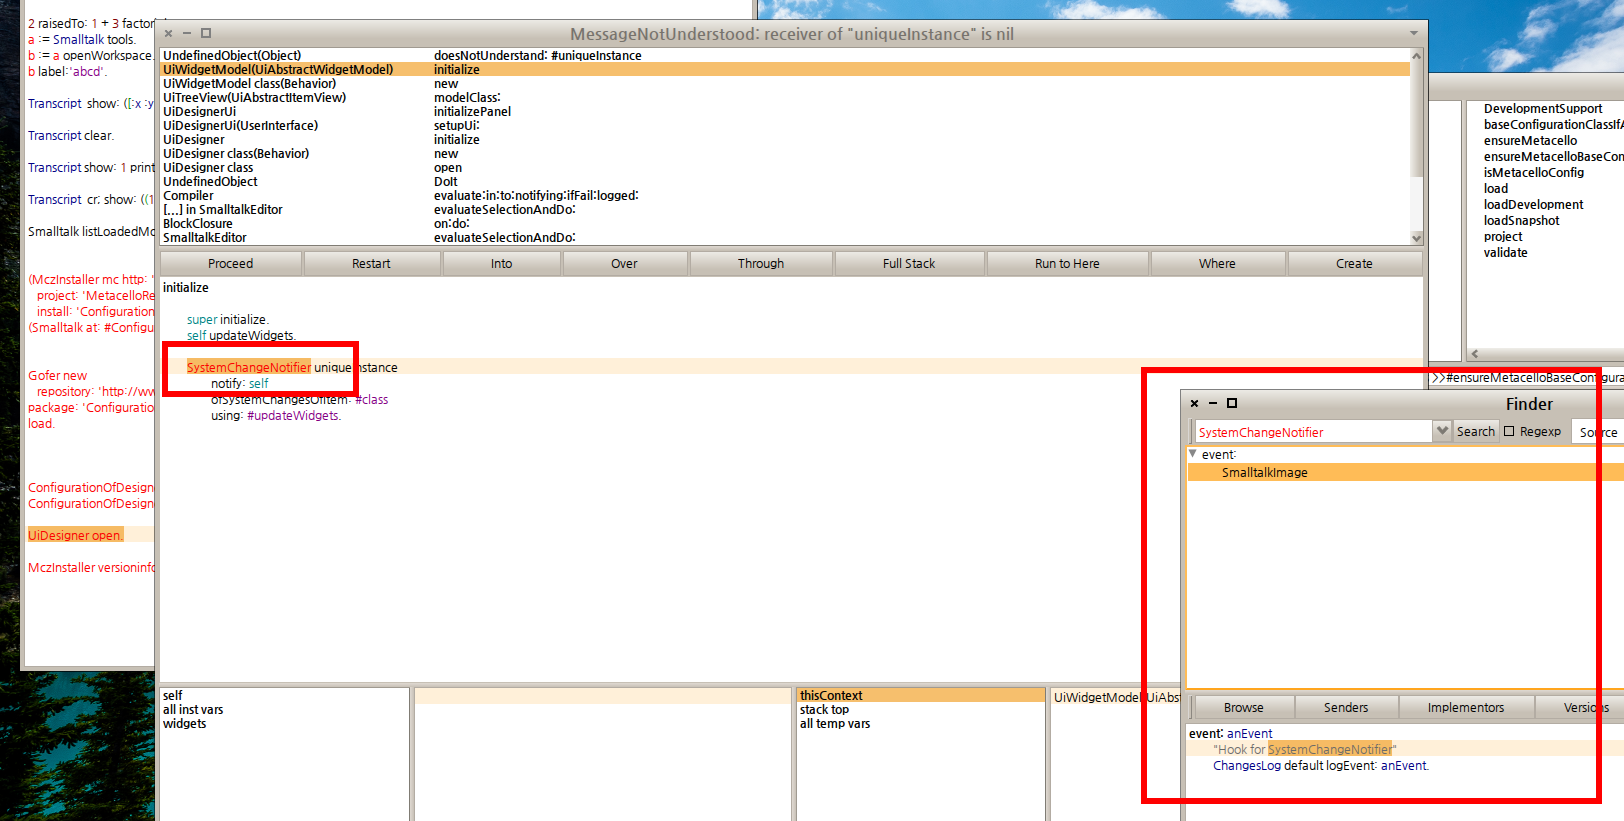
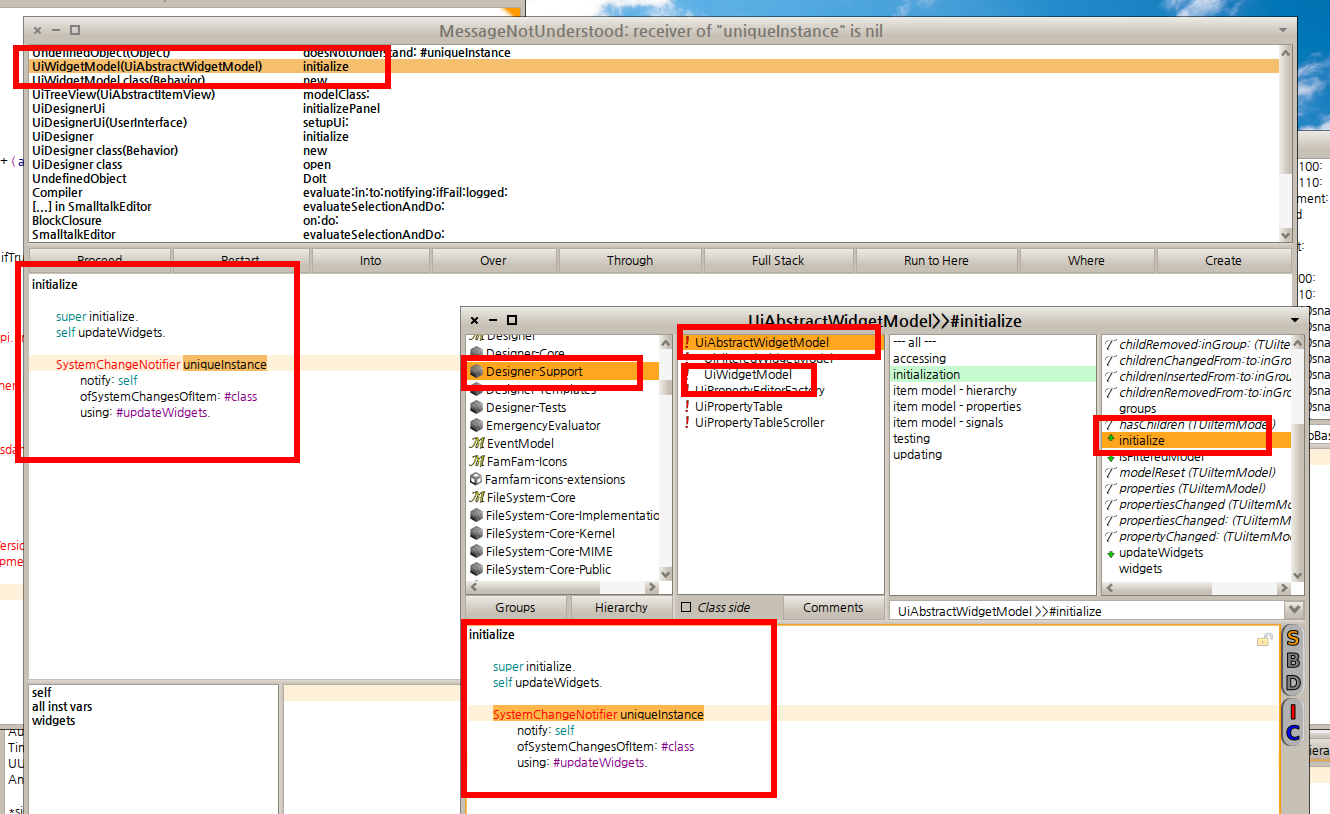
자 이제 debug step 에서 두번째 있는 item 인 initilize 를 선택해봤다. 여기서 눈에띄는것은 "SystemChangeNotifier" 와 "uniqueInstance" 두가지가 되겠다. (뭐 사실 "uniqueInstance" 는 그 아래쪽에 있는것들과 세트로 취급하는거지만..) 여튼간에 이걸 기준으로 찾아봐야 할거라는 생각이 들기 시작한다. 일단 붉은색은 뭔가 불길한 느낌이니 붉은색 글자인 "SystemChangeNotifier" 에 대해서 먼저 알아보도록 하자. "SystemChangeNotifier" 를 마우스 또는 키보드로 영역을 선택한다음 ctrl+b 를 이용해서 browse 를 시도해봤지만 진행되지 않는다. 아마도 해당되는 class instance 가 없기 때문일거다. 그럼 Finder 에서 해당되는걸 찾아보기로 했다. "source" 옵션을 이용해서 찾았다. 단 한개가 나왔는데..... 좀 이상하다.. 문자열이 주석문이다...
뭔가 이상하다는 느낌이 들기 시작했다. 아무래도 "SystemChangeNotifier" 에 대해서는 더이상 정보를 찾는게 의미가 없을거같았다. 그럼 또 다른 눈에 띄는 부분인 "uniqueInstance" 를 찾아보기로 했다.
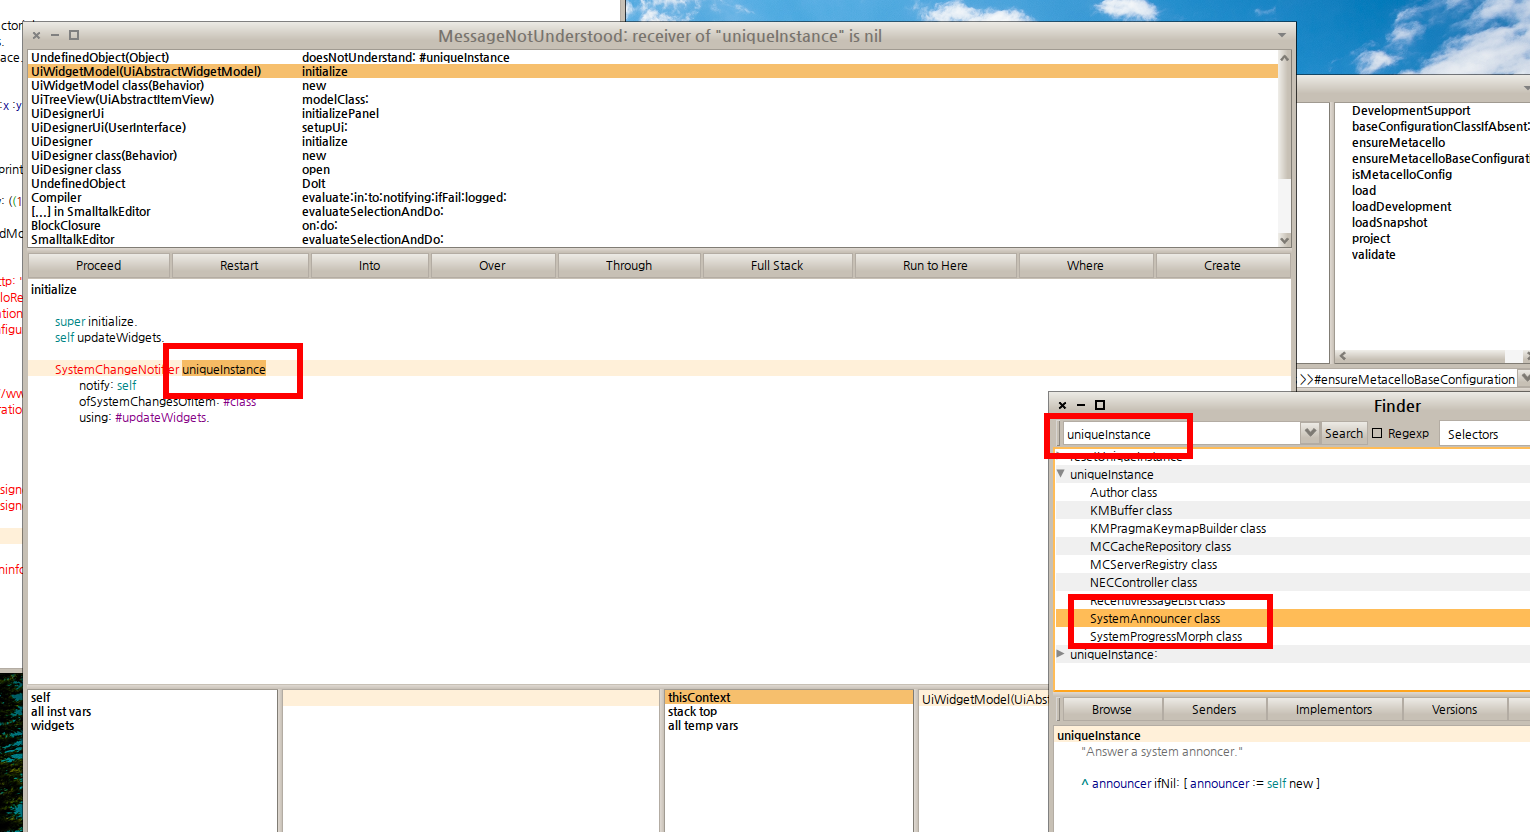
어쨋든 에러가 난 부분의 구문을 보면 "uniqueInstance" 는 메서드이기때문에 Finder 에서 selector 로 찾는게 빠를거라는 생각을 하고 검색을 시작했다. 생각보다 "uniqueInstance" 를 사용하는곳은 많은데 그중에서 가장 비슷해보이는 SystemAnnouncer class 를 보기로 했다. 웬지 notifier 랑 announcer ..... 비슷한 느낌이 들지 않는가?
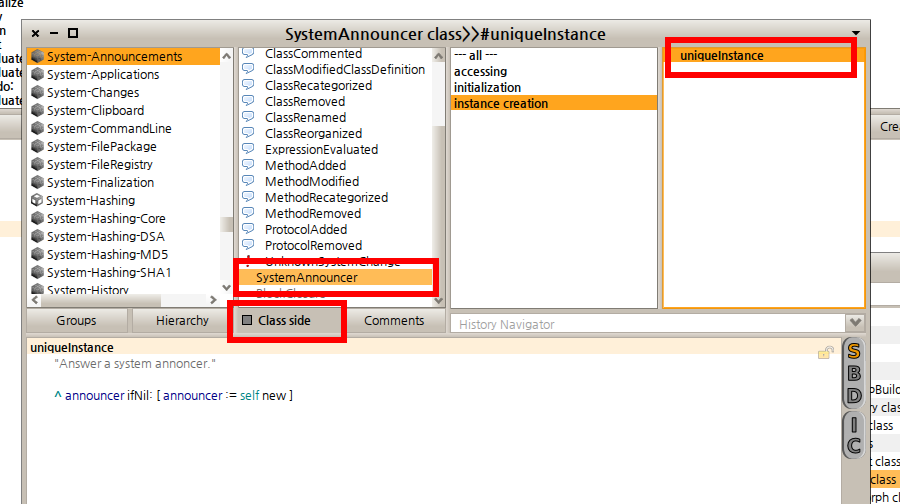
nautilus 를 통해서 찾아본 "SystemAnnouncer" 클래스는 다음과같은곳에 위치해 있다. class side 인것에 주의한다.
- System-Accouncements > SystemAnnounter > instance creation(protocol) > uniqueInstance
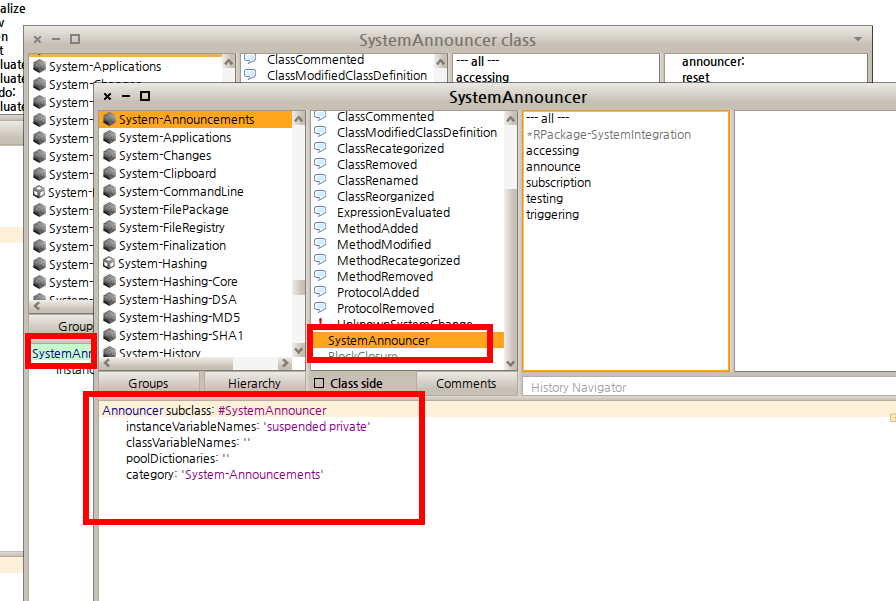
자 이제 뭔가 단서가 조금씩 잡히는 기분이 든다. SystemAccouncer class 를 클릭한다음 Class 부분을 클릭해서 Class 의 이름을 browse 하도록 한다. 오호.... 방금전에 봤던 화면이 또떴다! 이건 무슨 의미인고하면.. SystemAnnouncer 는 그 이름과 같은 Class instance 로 유지되고 있다는 의미가 되시겠다. 일단 우리가 찾은 "uniqueInstance" 메서드는 "SystemAccouncer" 에 적용하면 된다는 정도를 참고해두도록 하자.
일단 기본적으로 관련된 부분을 찾았으니 실제로 저 에러난 코드가 어디에 존재하는지를 알아야할 필요가 있을거같다. 일단 debug step 부분을 살펴보자. "UiWidgetModel" 이라는 클래스라고 한다. 그럼 UWidgetModel class 를 Finder 에서 찾으면 되곘다. 찾아진 UiWidgetModel class 의 위치는 다음과 같다.
- Designer-Support > UiAbstractWidgetModel > UiWidgetModel
흠.. 그런데 UiWidgetModel 에는 실제로 initilize 메서드가 없다. 어떻게 된거지? 그럼 UiWidgetModel class 의 부모클래스를 살펴보면 되겠다. 바로 "UiAbstractModel" class 에 initilize 메서드가 있다. 마우스로 클릭해보자. 이야 정확하게 debug 창에서 보이는 error 부분과 같은 코드가 있다. 이제 어디를 수정하면 되는지는 정확하게 파악을 했다. 여기까지 진행했다면 아래와 비슷한 화면을 볼 수 있을것이다.
Step 03 :: Pharo 와 SystemChangeNotifier, 그리고 SystemAnnouncer 에 관련된 에러
자 일단 본인은 "SystemChangeNotifier" 가 없다는 사실에 관심을 가지기 시작했다. 사실 원래 "Modphic Designer" 홈페이지에도 얘기가 있지만... pharo 에서는 이 패키지가 바로 동작하지 않는가 보다. 홈페이지를 보면 아래의 구문이 적혀있다.
- If you want to install this application into a Pharo image, here are some hints to to so: Installing Morphic UI Designer in Pharo 1.1.
아.. 그랬구나.. pharo 에서는 원래 그냥 안되는거였구나.. 그래서 따로 문서가 있었구나.......
이렇게 오늘도 하나 배웠다.....
여튼간에 관련된 문서는 사실 패키지의 설치방법부터 물어보고 있다. 물론 그 아래쪽에 여기서 설명하고자하는 핵심부분이 있지만..... 해당되는 페이지를 주욱주욱 읽다보면 한방에 안된다는 사실정도는 확인할 수 있다. 그러나 여기서 원하는 해답을 얻을 수는 없었다. google 을 좀 더 찾아보기로 했다. 그랬더니 다음과 같은 내용이 나오기 시작했다.
와우.. 2012 년에 언급된 내용이다. 나름 따끈한 내용이다. 이중에서 사실 결정적인 힌트가 될만한 부분이 있다. 첫번째 답글의 내용을 원문을 첨부해서 간략하게 살펴보면...
 That depends on what version of Pharo you use.
In Pharo 1.4 you can use SystemChangeNotifier to do something like this:

SystemChangeNotifier uniqueInstance
notify: toSomeObject
ofSystemChangesOfItem: #class
change: #Added
using: #someMethod:.

then if a new class is added to the system, SystemChangeNotifier will call #someMethod: on toSomeObject, passing an Event to #someMethod:. You can browse the code on SystemChangeNotifier to see all the notification you can use, and the package "System-Change Notification" to see the events you can receive.

In Pharo 2.0 you can do the same thing using SystemAnnouncer:

SystemAnnouncer uniqueInstance
on: ClassAdded
send: #someMethod:
to: toSomeObject.

You can see the different announcements you can use on browsing the package "System-announcements". In this example #someMethod: will receive an announcement.
--
Daniel Galdames
- 어떤 pharo 버전을 사용하는지에 따라 틀리다. Pharo 1.4 버전은 SystemChangeNotifier 를 사용할 수 있다. 새로운 클래스를 system 에 추가하기 위해서는 몇가지의 메서지를 사용하면 된다. 하지만 Pharo 2.0 에서는 SystemAnnouncer 를 사용해야한다. 뭐가 틀려졌는지는 "System-announcements" 패키지를 살펴보면 된다.
이정도의 내용을 설명하고있다. 어? 이전에 봤던 내용이다. 그것도 양쪽다. 위의 답글에서 언급된 code 는 2 종류 되시겠다. 하나는 SystemChangeNotifier, 다른하나는 SystemAnnouncer. 일단 두 코드 모두 살펴보자.
SystemChangeNotifier uniqueInstance
notify: toSomeObject
ofSystemChangesOfItem: #class
change: #Added
using: #someMethod:.
SystemAnnouncer uniqueInstance
on: ClassAdded
send: #someMethod:
to: toSomeObject.
오호... 이 문서에서는 Pharo 2.0 을 기준으로 한다고 이미 얘기한적이 있다. 현재 Pharo 2.0 system 에 들어있는 UiAbstractWidgetModel > iniilize 메서드를 옮겨보기로 하자.
initialize

	super initialize.
	self updateWidgets.

	SystemChangeNotifier uniqueInstance
		notify: self
		ofSystemChangesOfItem: #class
		using: #updateWidgets.
이제 현시점에서 문제가 되는 부분은 정확하게 파악한거같다. 위의 코드를 아래처럼 고쳐보도록 하자.
initialize

	super initialize.
	self updateWidgets.

	SystemAnnouncer uniqueInstance
	    on: ClassAdded
	    send: #updateWidgets
	    to: self.
이제 다시 workspace 에서 "UiDesigner open." 코드를 doit 하도록 한다. 지금의 문제는 해결이 된걸 확인할 수 있다[1]. 그러나 여기서 끝은 아니다.
Step 04 :: Pharo, 그리고 floodfill:at:tolerance: 메서드의 deprecate
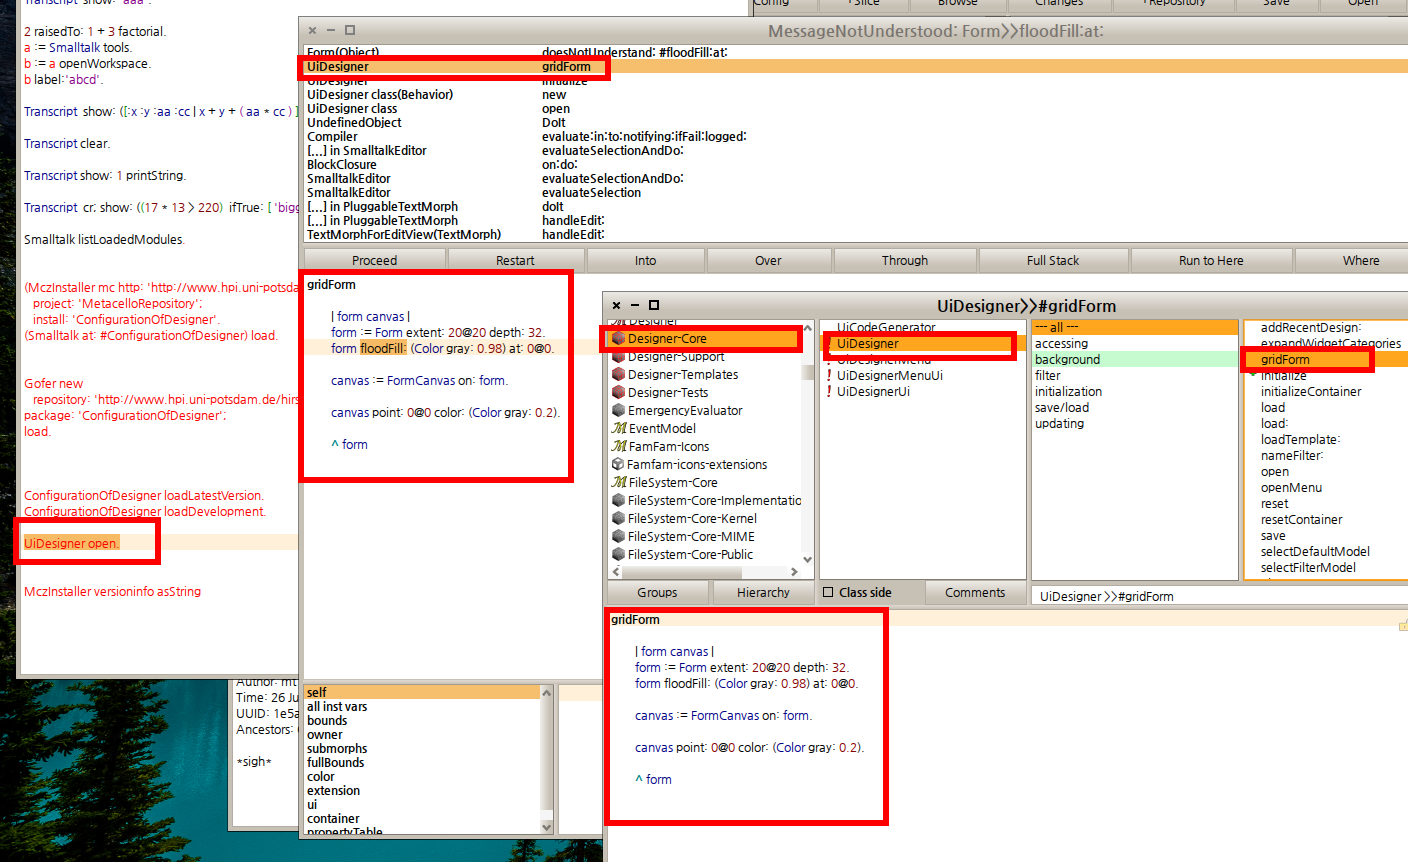
새로운 에러가 또 떴다. 이제 슬슬 디버깅하는 요령도 생겼다. 이번에는 한번에 가보도록 하자. 아래의 화면을 참고해서 설명하도록 하겠다.
- 디버거의 step 을 보도록 한다.
- UiDesigner 안쪽이 문제가 있는거같다. 해당되는 class 를 Finder 에서 찾도록 한다.
- 찾았다. 메서드는 gridForm 이니 해당되는 코드를 살펴보도록 하자.
- 에러가 난 이후 디버거쪽에 표시된 코드와 같은 코드임을 확인할 수 있다.
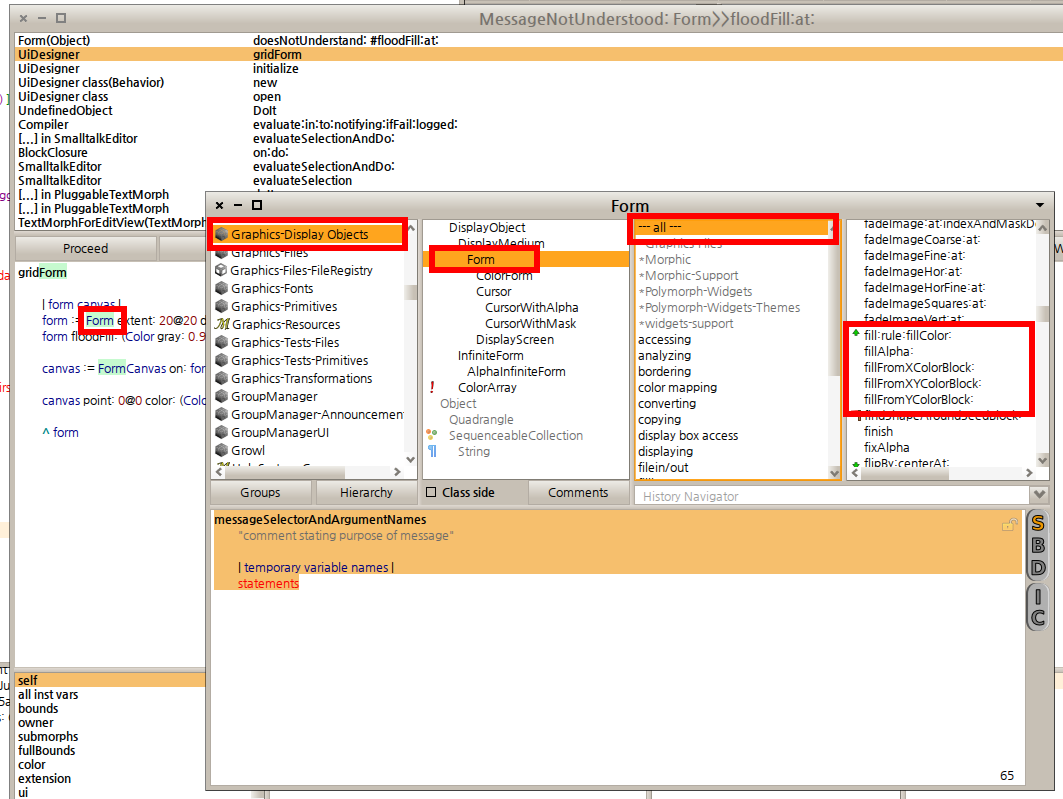
이 에러는 floodFill 이라는 메서드를 pharo 에서 해석하지 못하는데 그 원인이 있다. 일단 에러가 난 코드를 살펴보면 floodFill 은 form 의 메서드로 사용되고 있고 form 은 바로 위쪽에서 인스턴스 내의 변수로 선언되고 있다. form 은 "Form" class 의 인스턴스로 선언되어있으니 결과적으로 floodFill 은 Form class 의 메서드로 제대로 인식되지 않고있다는게 문제의 주요 요점이 되겠다. 그럼 Form class 를 좀 살펴보기로 하자. Finder 에서 Form class 를 찾는다.
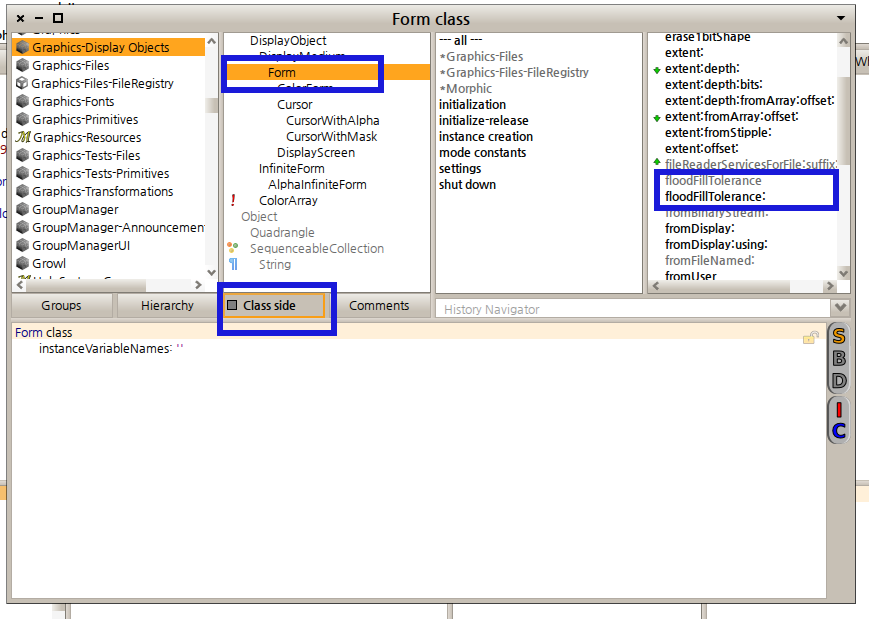
어라 Form class 를 봤더니 flood.. 로 시작하는 메서드가 아예 없다. 흐음.. 이건 뭔일이지? 이렇게 까지 틀려질리는 없는데.... 일단 class side 까지 살펴보기로 한다.
그럼 그렇지. 비슷하게 생긴 메서드를 class side 에서 확인할 수 있었다. 그러나 뭔가 이름이 좀 틀리다. 대체 뭔일이 일어난것일까... 아무래도 위쪽과 비슷하게 pharo 에서는 뭔가 다른 지원을 하고있는게 아닐까.. 라는 생각이 들기 시작했다. google 에 문의하니 다음과같은 자료를 찾을 수 있었다.
....이봐요 marcus 형님.. 대체 무슨직을 하신겁니까. 지워졌다니요~ 흠.. 일단 급한대로 floodFillTolerance: 메서드의 내용을 살펴보기로 했다.
floodFillTolerance: aFloat
	(aFloat >= 0.0 and: [aFloat < 0.3])
		ifTrue: [FloodFillTolerance := aFloat]
		ifFalse: [FloodFillTolerance := 0.0]
흠... 일단 코드의 내용을 보면 인수를 aFloat 로 받는다. 그리고 FloodFillTolerance 라는 변수의 값을 상황에 따라 바꾸고 있다. Form class 의 instance side 의 정의를 잠시 살펴보도록 하자.
DisplayMedium subclass: #Form
	instanceVariableNames: 'bits width height depth offset'
	classVariableNames: 'FloodFillTolerance'
	poolDictionaries: ''
	category: 'Graphics-Display Objects'
class 변수로 FloodFillTolerance 라는게 선언되어 있다. 그럼 이 메서드의 역할은 대략 알거같은데... 이쯤에서 원래 squeak 에서 지원하는 floodfill:at:tolerance: 라는 메서드의 내용을 살펴보기로 하자.
floodFill: aColor at: interiorPoint tolerance: tolerance
	"Fill the shape (4-connected) at interiorPoint.  The algorithm is based on Paul Heckbert's 'A Seed Fill Algorithm', Graphic Gems I, Academic Press, 1990.
	NOTE (ar): This variant has been heavily optimized to prevent the overhead of repeated calls to BitBlt. Usually this is a really big winner but the runtime now depends a bit on the complexity of the shape to be filled. For extremely complex shapes (say, a Hilbert curve) with very few pixels to fill it can be slower than #floodFill2:at: since it needs to repeatedly read the source bits. However, in all practical cases I found this variant to be 15-20 times faster than anything else.
	Further note (di):  I have added a feature that allows this routine to fill areas of approximately constant color (such as  photos, scans, and jpegs).  It does this by computing a color map for the peeker that maps all colors close to 'old' into colors identical to old.  This mild colorblindness achieves the desired effect with no further change or degradation of the algorithm.  tolerance should be 0 (exact match), or a value corresponding to those returned by Color>>diff:, with 0.1 being a reasonable starting choice."

	| peeker poker stack old new x y top x1 x2 dy left goRight span spanBits w box debug |
	debug := false. "set it to true to see the filling process"
	box := interiorPoint extent: 1@1.
	span := Form extent: width@1 depth: 32.
	spanBits := span bits.

	peeker := BitBlt current toForm: span.
	peeker
		sourceForm: self;
		combinationRule: 3;
		width: width;
		height: 1.

	"read old pixel value"
	peeker sourceOrigin: interiorPoint; destOrigin: interiorPoint x @ 0; width: 1; copyBits.
	old := spanBits at: interiorPoint x + 1.

	"compute new value (take care since the algorithm will fail if old = new)"
	new := self privateFloodFillValue: aColor.
	old = new ifTrue: [^ box].
	tolerance > 0 ifTrue:
		["Set up color map for approximate fills"
		peeker colorMap: (self floodFillMapFrom: self to: span mappingColorsWithin: tolerance to: old)].

	poker := BitBlt current toForm: self.
	poker
		fillColor: aColor;
		combinationRule: 3;
		width: width;
		height: 1.

	stack := OrderedCollection new: 50.
	x := interiorPoint x.
	y := interiorPoint y.
	(y >= 0 and:[y < height]) ifTrue:[
		stack addLast: {y. x. x. 1}. "y, left, right, dy"
		stack addLast: {y+1. x. x. -1}].

	[stack isEmpty] whileFalse:[
		debug ifTrue:[self displayOn: Display].
		top := stack removeLast.
		y := top at: 1. x1 := top at: 2. x2 := top at: 3. dy := top at: 4.
		y := y + dy.
		debug ifTrue:[
			Display
				drawLine: (Form extent: 1@1 depth: 8) fillWhite
				from: (x1-1)@y to: (x2+1)@y
				clippingBox: Display boundingBox
				rule: Form over fillColor: nil].
		"Segment of scanline (y-dy) for x1 <= x <= x2 was previously filled.
		Now explore adjacent pixels in scanline y."
		peeker sourceOrigin: 0@y; destOrigin: 0@0; width: width; copyBits.
			"Note: above is necessary since we don't know where we'll end up filling"
		x := x1.
		w := 0.
		[x >= 0 and:[(spanBits at: x+1) = old]] whileTrue:[
			w := w + 1.
			x := x - 1].
		w > 0 ifTrue:[
			"overwrite pixels"
			poker destOrigin: x+1@y; width: w; copyBits.
			box := box quickMerge: ((x+1@y) extent: w@1)].
		goRight := x < x1.
		left := x+1.
		(left < x1 and:[y-dy >= 0 and:[y-dy < height]])
			ifTrue:[stack addLast: {y. left. x1-1. 0-dy}].
		goRight ifTrue:[x := x1 + 1].
		[
			goRight ifTrue:[
				w := 0.
				[x < width and:[(spanBits at: x+1) = old]] whileTrue:[
					w := w + 1.
					x := x + 1].
				w > 0 ifTrue:[
					"overwrite pixels"
					poker destOrigin: (x-w)@y; width: w; copyBits.
					box := box quickMerge: ((x-w@y) extent: w@1)].
				(y+dy >= 0 and:[y+dy < height])
					ifTrue:[stack addLast: {y. left. x-1. dy}].
				(x > (x2+1) and:[y-dy >= 0 and:[y-dy >= 0]])
					ifTrue:[stack addLast: {y. x2+1. x-1. 0-dy}]].
			[(x := x + 1) <= x2 and:[(spanBits at: x+1) ~= old]] whileTrue.
			left := x.
			goRight := true.
		x <= x2] whileTrue.
	].
	^box
이 메서드의 선언부를 보도록 하자.
- floodFill: aColor at: interiorPoint tolerance: tolerance
흠.. 입력값으로 aColor 를 받는다. Color object 라는 의미가 되시겠다. 그리고 return 으로는 box 를 반환한다. box 는 interiorPoint 라는 값을 extent: 로 처리해서 받은다음 그걸 사용해서 재처리 된후 반환되는 구조인거같다. 이 경우 interiorPoint 는 "Kernel-BasicObjects > Point" 객체라고 보면 되고 이 Point class 의 extent: 메서드를 사용하는것이라고 짐작하면 될거같다. 사실 중요한건 이게 아니라.....
- squeak 의 floodfill:at:tolerance: 는 인스턴스 메서드이다.
- 입력값으로 aPoint 를 받는다.
- box 라는 객체를 반환한다. box 는 point 값을 가진 객체가 된다.
- pharo 의 floodTolerance: 클래스 메서드이다.
- 입력값으로 aColor 를 받는다.
- 반환되는 값은 없다.
어라............... 이러면 좀 곤란한데... 일단 지금 에러가 난 코드를 보도록 하겠다.
gridForm

	| form canvas |
	form := Form extent: 20@20 depth: 32.
	form floodFill: (Color gray: 0.98) at: 0@0.

	canvas := FormCanvas on: form.

	canvas point: 0@0 color: (Color gray: 0.2).

	^ form
흠.. 일단 floodfill:at:tolerance: 에서 floodfill:at: 까지만 사용하고 있는거같다. 흠.. 일단 대체제를 찾아야 할거같다. Form class 의 메서드들을 싹 뒤져보기로 했다. 어라? 어디서 많이 본 내용이 있는게 있다?
floodFill2: aColor at: interiorPoint
	"Fill the shape (4-connected) at interiorPoint.  The algorithm is based on Paul Heckbert's 'A Seed Fill Algorithm', Graphic Gems I, Academic Press, 1990.
	NOTE: This is a less optimized variant for flood filling which is precisely along the lines of Heckbert's algorithm. For almost all cases #floodFill:at: will be faster (see the comment there) but this method is left in both as reference and as a fallback if such a strange case is encountered in reality."
	| peeker poker stack old new x y top x1 x2 dy left goRight |
	peeker := BitBlt current bitPeekerFromForm: self.
	poker := BitBlt current bitPokerToForm: self.
	stack := OrderedCollection new: 50.
	"read old pixel value"
	old := peeker pixelAt: interiorPoint.
	"compute new value"
	new := self pixelValueFor: aColor.
	old = new ifTrue:[^self]. "no point, is there?!"

	x := interiorPoint x.
	y := interiorPoint y.
	(y >= 0 and:[y < height]) ifTrue:[
		stack addLast: {y. x. x. 1}. "y, left, right, dy"
		stack addLast: {y+1. x. x. -1}].
	[stack isEmpty] whileFalse:[
		top := stack removeLast.
		y := top at: 1. x1 := top at: 2. x2 := top at: 3. dy := top at: 4.
		y := y + dy.
		"Segment of scanline (y-dy) for x1 <= x <= x2 was previously filled.
		Now explore adjacent pixels in scanline y."
		x := x1.
		[x >= 0 and:[(peeker pixelAt: x@y) = old]] whileTrue:[
			poker pixelAt: x@y put: new.
			x := x - 1].
		goRight := x < x1.
		left := x+1.
		(left < x1 and:[y-dy >= 0 and:[y-dy < height]])
			ifTrue:[stack addLast: {y. left. x1-1. 0-dy}].
		goRight ifTrue:[x := x1 + 1].
		[
			goRight ifTrue:[
				[x < width and:[(peeker pixelAt: x@y) = old]] whileTrue:[
					poker pixelAt: x@y put: new.
					x := x + 1].
				(y+dy >= 0 and:[y+dy < height])
					ifTrue:[stack addLast: {y. left. x-1. dy}].
				(x > (x2+1) and:[y-dy >= 0 and:[y-dy >= 0]])
					ifTrue:[stack addLast: {y. x2+1. x-1. 0-dy}]].
			[(x := x + 1) <= x2 and:[(peeker pixelAt: x@y) ~= old]] whileTrue.
			left := x.
			goRight := true.
		x <= x2] whileTrue.
	].
메서드의 이름과 argument 의 개수등은 조금 틀리지만.. 기본적으로 주석문이 비슷하다. 일단 원래의 gridform 에서 별도로 반환값을 얻어서 사용하지는 않고있으니 한번 이걸로 바꿔서 사용해보자. 그렇게되면 gridform 의 내용이 다음처럼 수정되어야 할것이다.
gridForm

	| form canvas |
	form := Form extent: 20@20 depth: 32.
	form floodFill2: (Color gray: 0.98) at: 0@0.

	canvas := FormCanvas on: form.

	canvas point: 0@0 color: (Color gray: 0.2).

	^ form
자 수정한 코드를 저장하고 workspace 에서 doir 해보자. 일단 수정한 부분은 에러없이 지나간다(얼쑤!) 그러나 또 다른 문제가 나왔다. 역시 쉽게 가게 해주지는 않는다.
Step 05 :: Pharo, FormCanvas 의 point:color: 메서드의 deprecate 문제
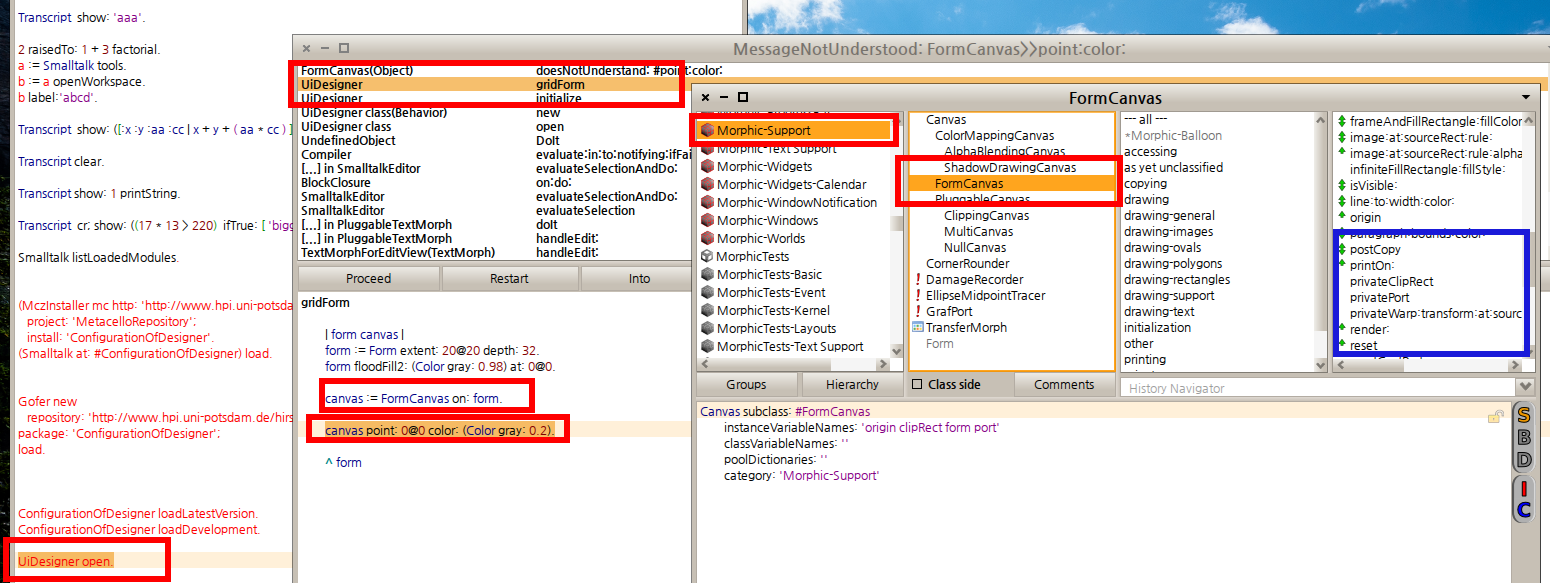
지금 발생하고 있는 문제의 대부분은 squeak 에서 Pharo 로 오면서 deprecate 된(뭐 리팩토링에 가깝곘습니다만...) 요소들때문에 그렇다. 이번에도 스크린샷을 참고로 설명을 간략하게해보도록 하겠다.
이번에는 canvas 라는놈한테 point:color: 메서드가 없다고 하는것같다. 코드상 canvas 는 FormCanvas 의 인스턴스로서 생성되기때문에 없는 메서드를 찾기위해서는 FormCanvas 를 찾아봐야 하겠다. FormCanvas 의 경우 바로 browse 가 가능하기때문에 굳이 Finder를 통하지 않아도 필요한 class 를 바로 찾아낼 수 있다. 그렇게 해서 찾아봤는데.... 아예없다. 이번에는 비슷한 이름 조차도 없다. google 의 도움을 받아 검색했더니 다음과같은 문서가 나왔다.
또 없어진 코드가 사용되고 있다. 참고로 squeak 에는 아직 코드가 있는듯하니... 최신버전인 squeak 4.4. one click 버전에서 해당되는 메서드가 대체 뭐인지 정체를 좀 살펴봐야할 필요가 있겠다. 다행이 있었다. 아래는 FormCanvas class 의 point:color: 메서드의 내용이다.
point: pt color: c

	form colorAt: (pt + origin) put: c.
오호.. 그럼 부모쪽에서는 어떻게 되어있는지 좀 궁금하기도 하다. FormCanvas 의 부모클래스인 Canvas class 의 point:color: 메서드를 살펴보도록 하겠다.
point: p color: c
	"Obsolete - will be removed in the future"
어라.. 미래에는 사라질거란다. 별도로 subclassResponsibility 가 사용되지 않을걸 보면 굳이 자식클래스에서 상속받아 구현을 해야되는 내용도 아니다. 어차피 squeak 에서도 없어질 놈이니 큰맘먹고 개조수술을 진행해보기로 하겠다.
일단 원래의 point:color 메서드는 Form class 의 colorAt:put: 이라는 메서드를 사용한다. 그럼 pharo 에 이게 있는지부터 확인하는게 우선순위 되시겠다. 그럼 nautilus 를 열어보자... 오! 신이여 만세! 있다! 안없어졌다!!! 있다!!! T.T
colorAt: aPoint put: aColor
	"Store a Color into the pixel at coordinate aPoint.  "

	self pixelValueAt: aPoint put: (self pixelValueFor: aColor).

"[Sensor anyButtonPressed] whileFalse:
	[Display colorAt: Sensor cursorPoint put: Color red]"
자 뭔가 꼬이는 기분이 드니까 일단 squeak 과 pharo 의 클래스별 메서드 차이를 다음과같이 정리해봤다.
| smalltalk env | 클래스 | 메서드명 | 존재유뮤 |
| squeak 4.4 oneclick | Canvas class | point:color: | skeleton |
| squeak 4.4 oneclick | FormCanvas class | point:color: | O |
| squeak 4.4 oneclick | Canvas class | colotAt:put: | X |
| squeak 4.4 oneclick | FormCanvas class | colotAt:put: | X |
| squeak 4.4 oneclick | Form class | colorAt:put: | O |
| Pharo 2.0 | Canvas class | point:color: | X |
| Pharo 2.0 | FormCanvas class | point:color: | X |
| Pharo 2.0 | Canvas class | colotAt:put: | X |
| Pharo 2.0 | FormCanvas class | colotAt:put: | X |
| Pharo 2.0 | Form class | colorAt:put: | O |
| Squeak 과 pharo 의 메서드 비교 | |||
결국 point:color: 메서드가 문제가 되는거다. 위쪽에서 언급했던 point:color: 메서드의 실제 구현을 다시 한번 보도록 하자.
point: pt color: c

	form colorAt: (pt + origin) put: c.
기본적으로 하는일은 orign 이라는 변수와 입력받은 포인트와 orign 이라는 인스턴스 변수의 값을 조압해서 colorAt:put: 메서드를 진행하고 있다. 이미 위쪽의 표에서 form 에는 colorAt:put: 메서드는 존재한다는걸 알고있기때문에 orign 이라는 인스턴스 변수가 pharo 의 FormCanvas 에도 존재하는지를 확인하면 된다. pharo 에 있는 FormCanvas 의 클래스 정의를 살펴보자.
Canvas subclass: #FormCanvas
	instanceVariableNames: 'origin clipRect form port'
	classVariableNames: ''
	poolDictionaries: ''
	category: 'Morphic-Support'
만세! 일단 변수는 있다. 그럼 지금 문제가 되는 부분은 canvas 에서 point:color: 메서드를 못쓴다는건데 이 부분은 조금 다르게 생각해보자. 일단 지금 gridForm 메서드 내부에서 사용되는 canvas 객체는 FormCanvas 객체의 인스턴스가 되어있으며 FormCanvas 는 인스턴스를 생성할때 form 을 이용해서 쓰고있다. point:color: 메서드는 내부적으로 form 객체의 colorAt:put: 메서드를 쓰고있으니... FormCanvas 에 form 이 넘어가기전에 colorAt:put: 을 적용시킨 상태로 넘기는건 어떨까? 일단 코드를 다음처럼 수정해보도록 하자.
gridForm

	| form canvas test_canvas colorat_value |
	form := Form extent: 20@20 depth: 32.
	form floodFill2: (Color gray: 0.98) at: 0@0.

	test_canvas := FormCanvas on: form.

	colorat_value := 0@0 + (test_canvas origin).
	form colorAt: colorat_value  put: (Color gray: 0.2).

	canvas := FormCanvas on: form.

	^ form
자 이제 할 수 있는 수정은 다 해봤다. 다시 workspace 에서 "UiDesigner open." 코드를 doit 해보도록 하자.
Step 06 :: 프로그램 구동성공! 그러나 아직 끝나지 않았다. positionInWorld 메서드
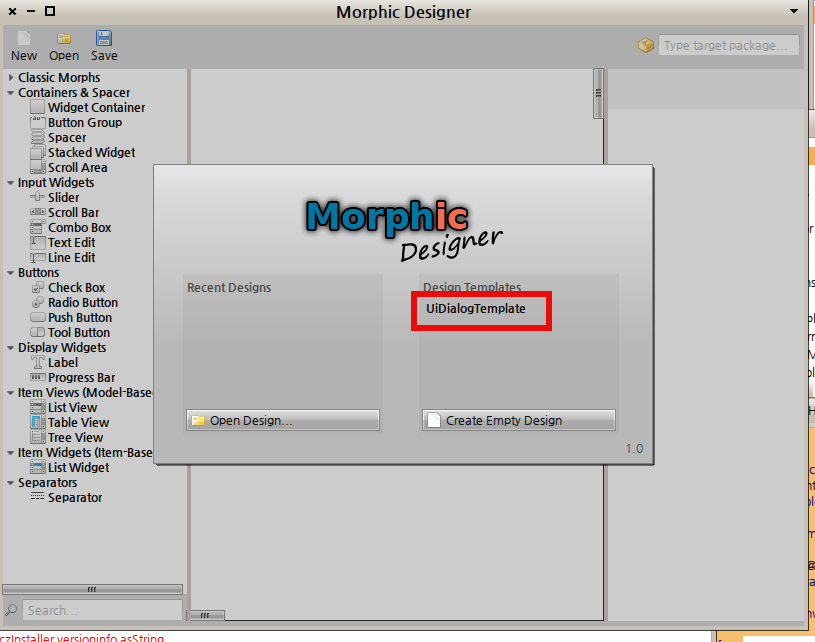
오오.... 동영상에서 봤던 바로 그 화면이 보인다 좀 간지난다. 일단 생긴건 봐야겠지 UIDialogTemplate 을 클릭해서 기본적으로 들어있는 템플릿을 열어보도록 한다.
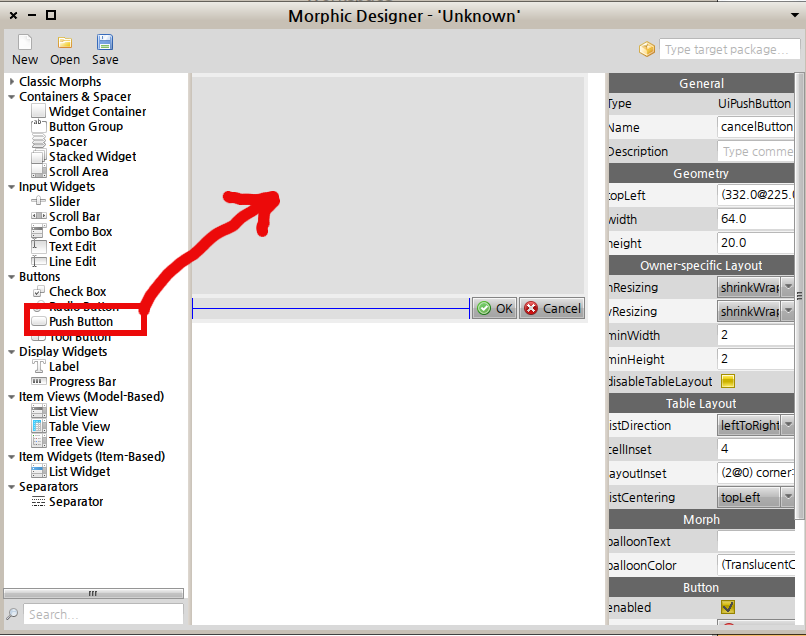
오오! 뭔가 열렸다 pharo 에서 이런화면을 보다니.. 감격스러울 지경이다. 좀 짱인데? 그럼 button 하나를 drag 해보도록 하자.
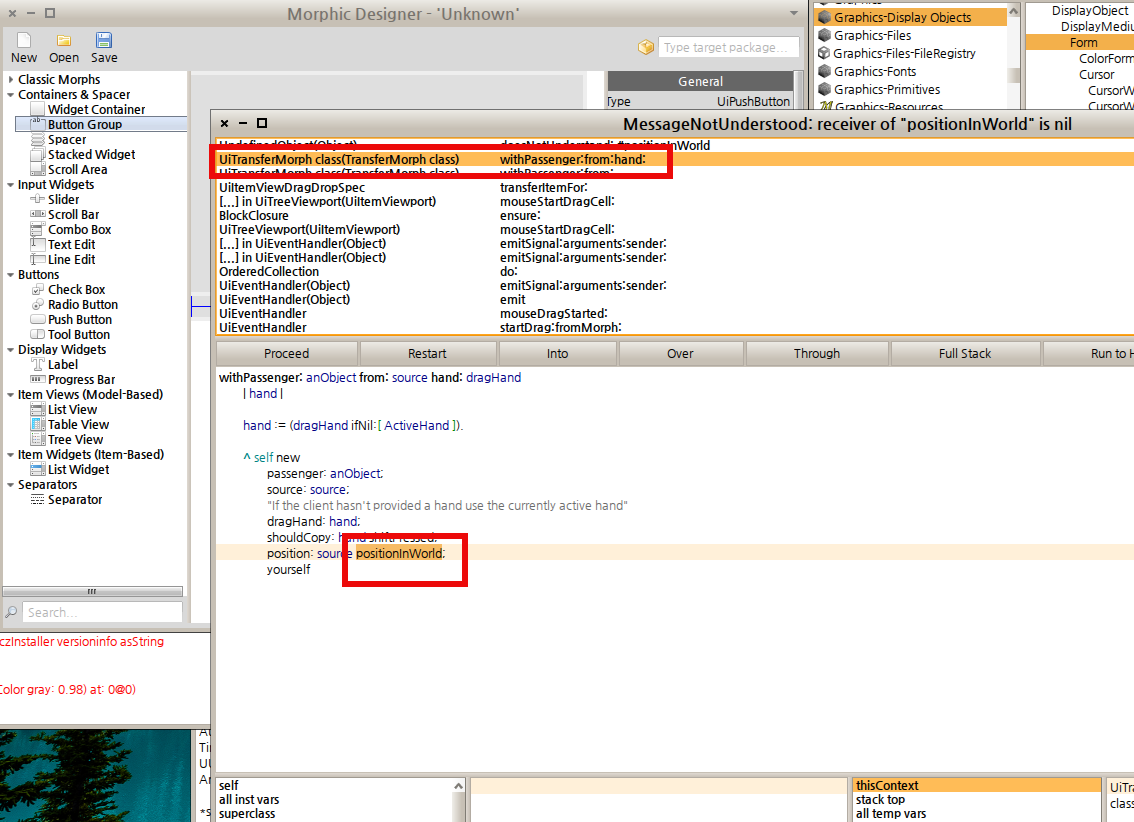
...............여보세요? 또 뭔가 버그가 나왔다. 버그는 디버그하라고 있는것 이번에는 뭐가 문제일지 살펴보기로 하자. 일단 이전과 메세지가 좀 틀리기는 하다. 이전에는 메서드가 없는 경우였다면 이번에는 positionInWorld 가 nil 이어서 문제가 된단다. 자 그럼 문제가 일어난 부분의 소스코드를 보기로 하자. 살펴 봐야하는 메서드의 위치는 다음과 같다.
- Widgets-Views-Support > UiTransferMorph
어라.. 그런데 뒤져봐도 UiTransferMorph class 안쪽에 withPassenger:from:hand: 라는게 보이지를 않는다. 그럼 또 거슬러 올라가봐야겠지. UiTransferMorph class 의 부모클래스는 다음과같다. 이쪽에서 원하는 메서드를 찾아볼 수 있었다.
- Morphic-Support > TransferMorph > instance creation(protocol) > withPassenger:from:hand:(class side)
오호라... 여기있구나~ 사실 디버거창을 보면 제목부분에 "UiTransferMorph(TransferMorph class)" 라고 쓰여있기는 하다. 비교해보자. 아.. 에러가 나와있는곳이랑 똑같다. 이제 디버깅을 해야할 포인트는 찾은거같다. 코드를 살펴보도록 하자.
withPassenger: anObject from: source hand: dragHand
	| hand |

	hand := (dragHand ifNil:[ ActiveHand ]).

	^ self new
		passenger: anObject;
		source: source;
		"If the client hasn't provided a hand use the currently active hand"
		dragHand: hand;
		shouldCopy: hand shiftPressed;
		position: source positionInWorld;
		yourself
사실 이번의 버그는 좀 성격이 틀리다. 디버거창의 상단을 보면 다음과같은 메세지가 있다.
- MessageNotUnderstood: receiver of "postitionInWord" is nil
흐음... 지금처럼 뭔가 메서드가 없다라던가 그런식의 오류가 아닌것에 주의한다. 일단 위의 로직을 더듬어가면 내려놓을때 뭔가 객체를 생성하게 되는데 이때 positionInWorld 메서드를 사용하는 객체가 nil 객체여서 실제로 작동할 수 있는게 없기때문에 문제가 되는경우가 아닐까 싶다. 그럼 positionInWorld 를 사용하는 메서드는 source 가 되는데 이 source 는 from: 이라는걸 통해서 인수로 받아오는 무언가가 되겠다. 위의 디버거창에서 나온 정보를 토대로 드래그가 시작될때부터의 순서를 추적해보도록 하겠다.
- mouse 로 드래그를 시작하면 UiTreeVireport(UiItemViewport) 의 mouseStartDragCell: 메서드가 실행된다. 이 메서드는 중간에 특정한 부분을 부르게 된다.
- (self dragDropSpec transferItemFor: nodes asOrderedCollection)
- 코드 부분에서 dragDropSpec 은 UiItemViewport 내의 인스턴스 변수로서 UiItemViewDragDropSpec 의 인스턴스임을 알 수 있다.
- UiItemViewDragDropSpec 의 transferItemFor: 메서드의 인수로서 node 를 OrderedCollection 형으로 반환한다.
- transferItemFor: 메서드는 인수로 받은 someNodes 를 다음의 코드로 넘긴다
- UiTransferMorph withPassenger: someNodes from: self source
- 결과적으로 OrderedCollection 형태로 넘어온 someNode 와 self 를 UiTransferMorph class 의 withPassenger:from: 메서드로 넘기는것이다.
- UiTransferMorph class 의 withPassenger:from: 메서드는 내부적으로 withPassenger:from:hand: 메서드를 호출하게 된다.
자.... 순서를 보기전에 문제가 있다라고 짐작되는 source 라는 객체는 UiItemViewDragDropSpec class 의 내부 인스턴스 변수로서 transferItemFor: 메서드의 내부 동작에서 전달되는 과정에 생기는 문제라고 보면 되겠다. 그럼 디버깅을 시작해봐야 하는 포인트는 일단 이게 될거라 생각한다. (사실은 그 이전부터의 문제일지도 모르지만.. 본인은 그런 과정은 알 수가 없다)
UiItemViewDragDropSpec class 의 transferItemFor: 메서드의 코드를 다음과같이 바꿔본다.
transferItemFor: someNodes

    Transcript show: (self source class).

	^ (UiTransferMorph withPassenger: someNodes from: self source)
		dragTransferType: self dragTransferType
일단 실행해보자. Transcript 에 다음과같은 메세지가 나올것이다.
UndefinedObject
응? 정의되지 않은 객체라는 의미가 되겠다. 이건 대체 뭔소리지? UiItemViewDragDropSpec 의 instance 안에 있는 source 내에 값이 없다는 얘기다. 그럼 코드를 다음처럼 변경해보도록 하자.
transferItemFor: someNodes

    Transcript show: (self source asString).

	^ (UiTransferMorph withPassenger: someNodes from: self source)
		dragTransferType: self dragTransferType
값은 nil 이 나오게 된다. 이게 뭔소린가? 정말로 source 에 아무것도 안들어가있다는 얘기다. 이제부터 이걸 기준으로 찾아봐야 하는데 어디부터 찾아봐야 할까?
Step 07 :: 이후의 디버깅 추적과정
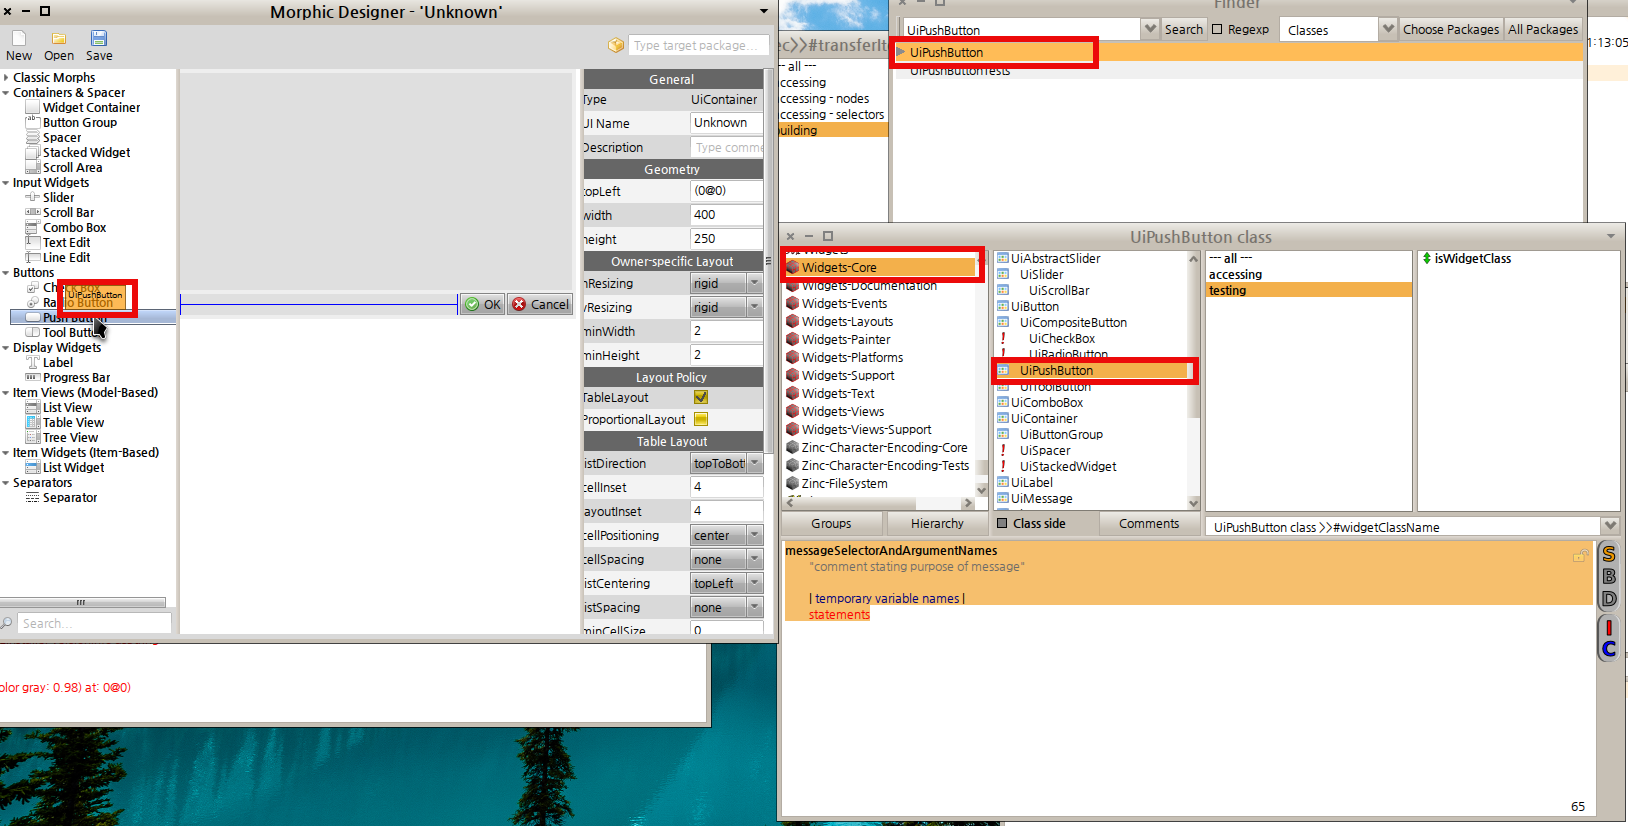
지금까지의 방법으로는 길을 찾을수가 없어서 일단 위처럼 button 에 대한 디버깅을 진행해보기로 했다. 버튼에 대한 클래스를 검색하고 해당되는 클래스를 브라우징 해보기로 했다.
흠 이 방법으로는 어떻게 작동되는건지 힌트를 얻을 수가 없을거같았다. 그래서 list widget 자체를 살펴보기로 했다.
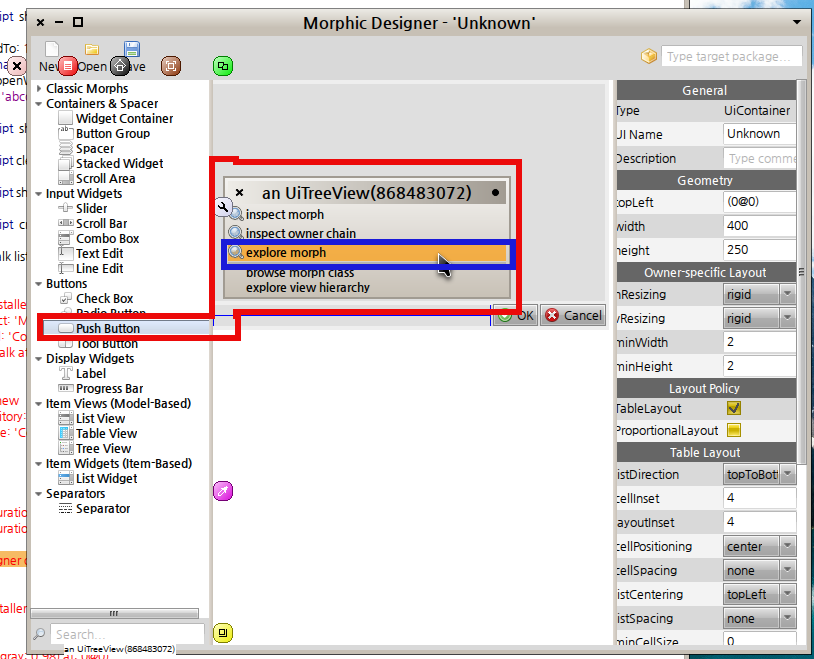
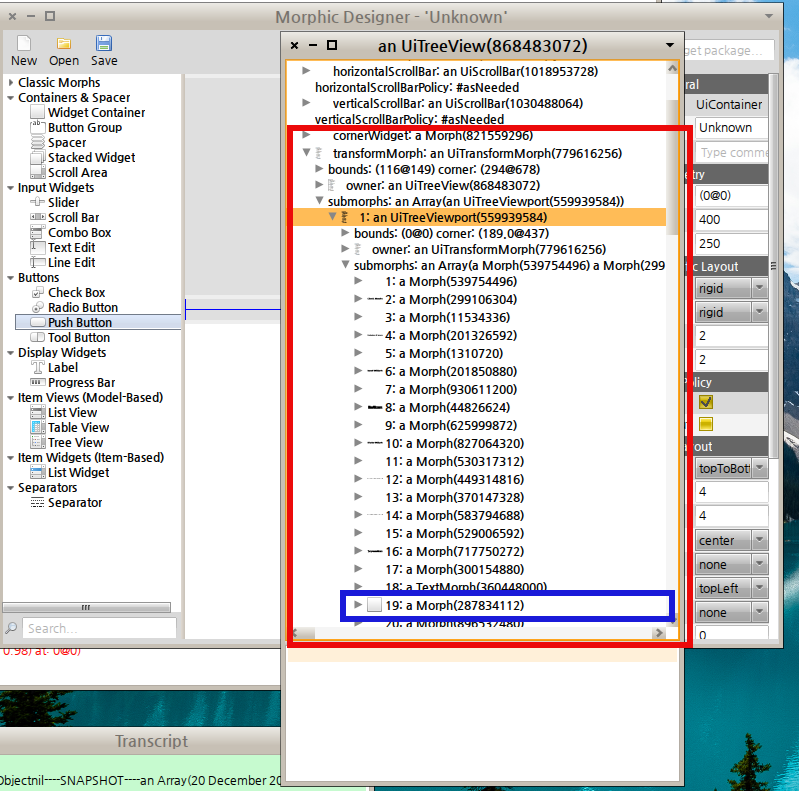
halo 을 이용해서 morph 를 살펴보기로 했다. (대략 3단계정도 morph 를 보면 화면에 보이듯이 UiTreeView 객체를 살펴볼 수가 있다.
오호.. 버튼을 찾았다. 그럼 이 버튼은 내가 보고싶었던 버튼이 맞는건가?
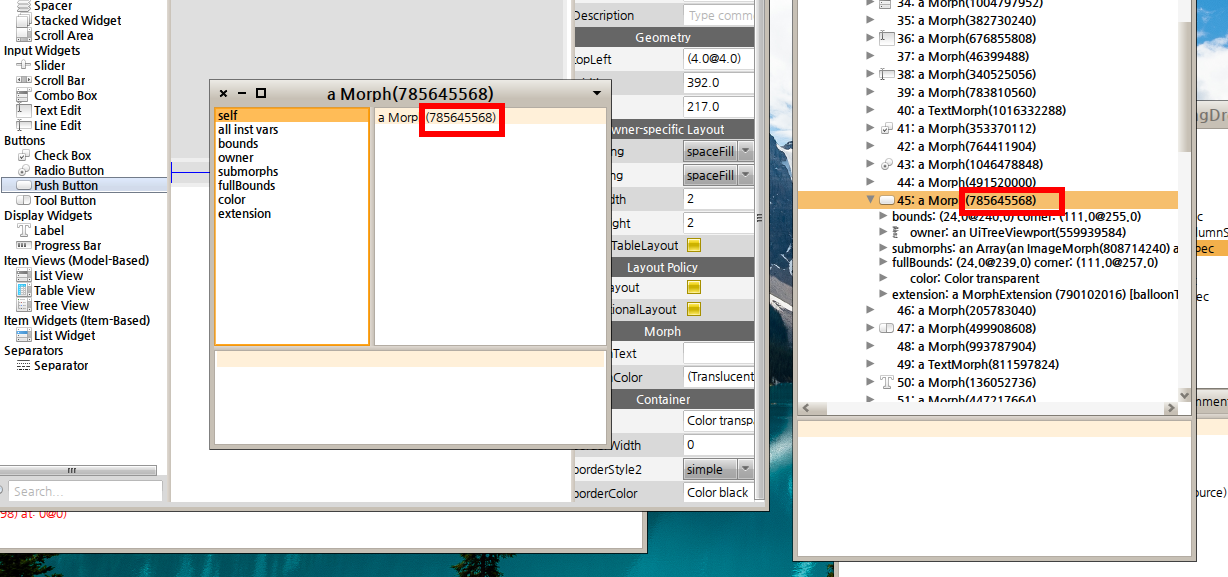
객체의 번호를 살펴보면 된다. 일단 같은 객체번호인걸 확인할 수 있다.
Step 08 :: 해결된 "source"
이때 pharo-dev 메일링 리스트에서 희소식이 날아왔다. 내용을 간략하게 정리해보면...
- Pharo 는 squeak 과는 틀리다. morph 를 비롯해서 변경점들이 좀 있다
- 지금 source 가 nil 인 문제는 source 에 대한 초기화부분이 빠져서 그렇다. 고로 다음의 부분을 수정하면 될거다.
오호.. 좋다. 그래서 알려준대로 다음의 부분을 수정해보기로 했다.
Designer-Core > UiDesigner > initialization(protocol) > initialize
위 메서드중 해당되는 부분의 코드는 다음과 같다.
"BAD: Viewport should not be accessed from the outside."
self ui widgetList viewport dragEnabled: true.
self ui widgetList
    selectionMode: UiViewSingleSelection;
    dragDropSpec: (UiItemViewDragDropSpec new
        dropEnabled: false;
        dragTransferType: #widgetClass).
위의 코드를 다음과 같이 변경한다.
"BAD: Viewport should not be accessed from the outside."
self ui widgetList viewport dragEnabled: true.
self ui widgetList
    selectionMode: UiViewSingleSelection;
    dragDropSpec: (UiItemViewDragDropSpec new
        source: (self ui widgetList);
        dropEnabled: false;
        dragTransferType: #widgetClass).
이제 잘 되는가 테스트해보도록 하자. 아마.. 잘 될거다 :D
Step 09 :: 남아있는 버그-property 수정이 되지않는 버그
화면상에 button 이 내려지는건 잘 되기 시작했다. 그러나 UI 의 property 를 수정할 수 없는 문제가 있었다. 뭐가 문제인지 찾아보기 위해 또 디버깅을 해보기로 했다.
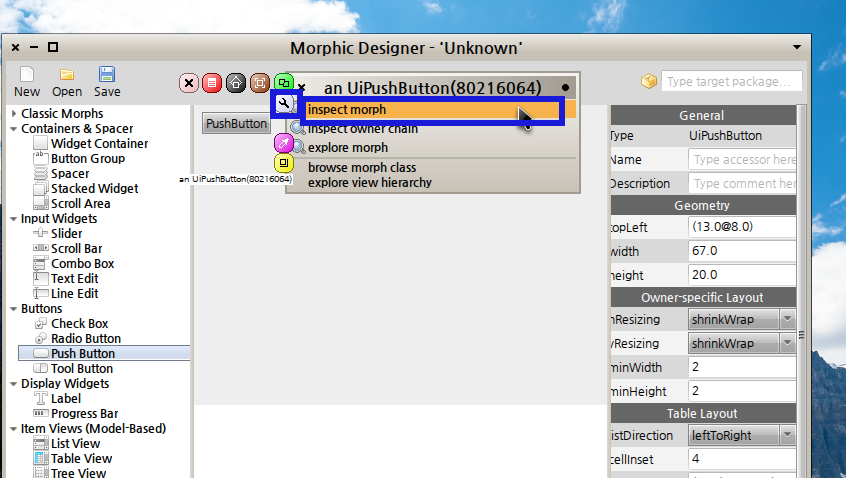
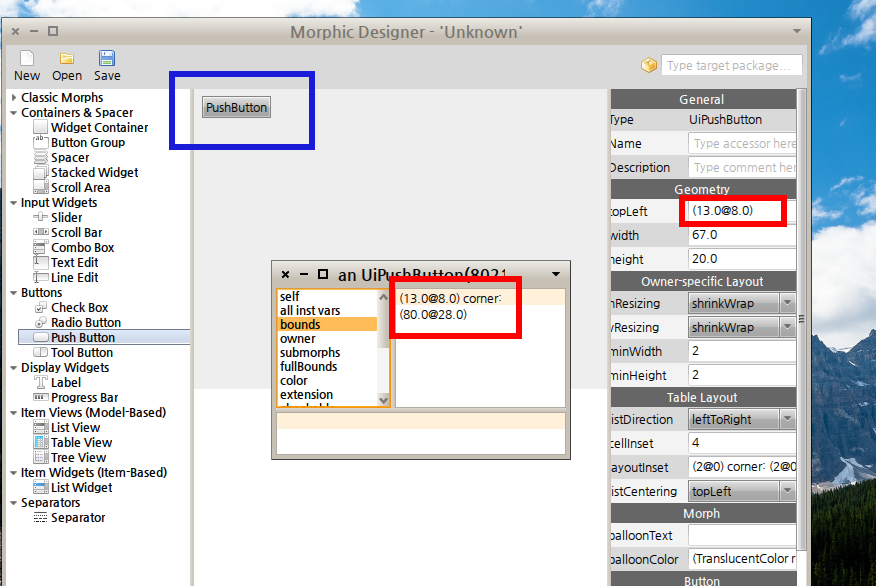
화면에 버튼을 하나 올리고 버튼의 halo 핸들을 이용해서 inspect morph 를 진행해본다.
일단 옆쪽의 editor 와 수치가 같은걸 보면 제대로 찾기는한거같다. 그러나 문제는 쉽지 않다. 왜냐하면... 여기서 뭔가를 편집한다고 해도 실제로 바뀌는게 적용되지 않기 때문이다. 이제부터 이걸 어떻게 해봐야 할까?
Notes
- ↑ 조금 더 간단하게 되어있는 설명도 있다. http://stackoverflow.com/questions/7975588/classes-events-on-change-pharo 주소를 참고해도 된다.
